• Skip to primary navigation
  • Skip to main content
  • Skip to primary sidebar
  • Skip to footer

Sweet Love and Ginger

  • Home
  • About
  • Recipes
  • Garden
  • Work With Me

12-12-12

Over Sized Dream Catcher Project

By Jessica

This post may contain affiliate links. I may receive commissions for purchases made through links in this post.

This is project no. 6 in my 12-12-12 series of craft projects using different materials and methods throughout the year.

IMG_8005

For this month’s (really last month, but we are still playing catch up over here) project I wanted to do something with rope. I had a number of ideas (mostly these) but with time, money constraints and the fact that I can’t find my hot glue gun to save my life, had a lot to do with the decision to dial it back and go with a simple dream catcher instead.

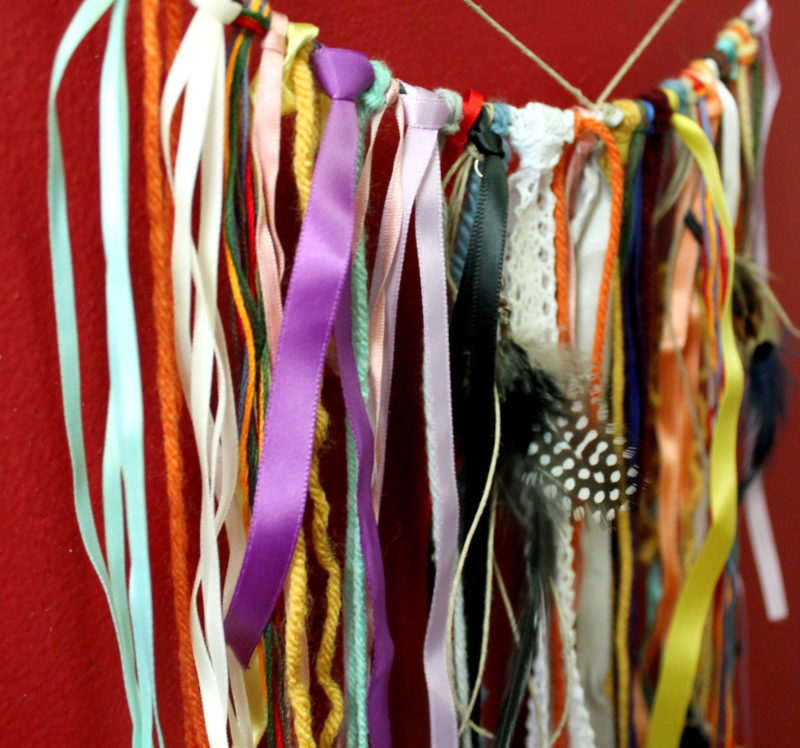
The hoop is actually a piece from an old tomato cage that broke in the move, and the twine is just what I had laying around. I used up a large portion of my ribbon stash, and then got some more from my grandmother for the danglies (yeah, it’s a technical term) at the bottom of the hoop. I also used up some small silk flowers, feathers, and beads that I had hanging around to add some more character.

IMG_8009

I love the simplicity of this project and that I was able to use so many stash items, we are trying to cut back on stuff after all. I would like to add a bit more to it, but I think it’s going to be one of those things that happen as I find myself with scraps and leftover beads.

I’m happy with how it turned out and think it will make a great addition to the spare bedroom with its bright red walls. The only thing that I’m not in love with is the slack in the center of the dream catcher. I had a really hard time keeping the string tight when I got to it. If anyone has any tips or tricks for getting this right let me know. I may just rip out the last two rows of string and try it again when I have more time.


August 17, 2015 August 17, 2015 Filed Under: 12-12-12, Crafts

Wood Burnt Popsicle Stick Bracelets

By Jessica

This post may contain affiliate links. I may receive commissions for purchases made through links in this post.

This post is a how to on turning popsicle sticks into bracelets using wood burning techniques. 

  IMG_7745.2

Project No. 5. This project get’s an eh-ok rating. It was a fun afternoon, but I’m someone who likes rapid results so waiting for popsicles to soak and then dry was apparently too much for me. I kind of got bored half way through.

I got a soldering set for Christmas, or my birthday (I can’t remember?) and have been dying for a project to use it for. It’s this set for reference. I really want to make some cool jewelry but there’s really no good set up at our apartment for hot metal work, so I’m holding out for our future house set up (fingers crossed we can get in soon!). In the mean time I thought this would be a good way to get comfortable with the tools.

IMG_7733

My guess was right, I learned a lot, how to hold the iron, how fast it heats up, what the difference is heat does to wood, how smooth it draws, or doesn’t. I did enjoy the wood burning part, thought it’s nothing like drawing. First off you can’t hold it like a pencil, and you have to move slowly and evenly and not push too hard. Typing that makes me realize that this might be a good exercise in control for me, because clearly I have a problem with it. I don’t think I have the patience to really get into wood burning, but it’s nice to know that I can do it.

Here is what I did:

  1. Draw designs on popsicle sticks
  2. Wood burn over the drawings
  3. Soak the sticks in water for about 2 days (they didn’t seem pliable enough after 24 hours)
  4. Carefully hand bend the sticks and place them in a cup to dry
  5. After the sticks are fully dry remove them from the cups

As far as soaking the wood and bending it; I learned a lot there too. I attempted to do the burning on the flat popsicle stick and then bend it, only to find out that many of the places I had burnt become breaking points for the wood. Next time I would bend them ahead of time and burn after, though it might make the burning part more difficult.

IMG_7742

I also realized that my tiny wrists are not suited for this project because the bracelets just slip right off my wrist. I thought of doing this to them to help them stay, but honestly I’m just not that into the bracelets to keep working with them. A few of the sticks that would not bend at all I could potentially use as book marks, since I always seem to lose those.

So even if this project isn’t something I would do again that doesn’t mean that you won’t absolutely love it or come up with a better way than I did. I also learned a thing or two so it was well worth the time.

June 15, 2015 June 14, 2015 Filed Under: 12-12-12, Crafts

Project No. 4 – Wood Photo Backdrop

By Jessica

This post may contain affiliate links. I may receive commissions for purchases made through links in this post.


photo back drop how to cover

I don’t think this project could be more fitting for my blog. I’ve been thinking for a while that I needed to move up in the world and start using more props and professional looking backgrounds in my photos. In the last year or two I really put in some effort to learn how to take better photographs. While I love art, I have never been good a getting quality photos, but I think I have learned a great deal and have really improved my skills quite a bit. The photo below is a perfect example of this.

Improve Food Photograhy

The recipe above is South West Meatballs Skillet.

I owe much of this improvement to the Tasty Food Photography ebook from Pinch of Yum. If food photography or photography in general is something you are interested in I definitely suggest you check this book out. It has so much useful information that applies to a wide range of photography, not just food (think jewelry, paper products and other inanimate objects).

Tasty Food Photography eBook

I got everything I needed at the local hardware store for about $3o. I used **pieces of #”x2’ craft wood and 2 pieces of 2.5”x2’ craft wood (1/4” thick wood), and wood glue to build the boards. Then I bought a stain sample and some white paint to give them some color.

IMG_7445

Here’s what I did

1) First I laid out half the wood to make a square that was roughly 2’ in length.

2) Then I used the remaining boards in the opposite direction to create another board.

3) I glued them all in place with the wood glue. A quarter sized drop of glue where each board touches should be enough.

4)Let it dry overnight with a couple crates of books on top of it. The weight helps press the wood together while it dries.

5) The next day I spray painted one side white, and let it dry. It was a super hot and sunny day so it was dry in less than 30 minutes.

6) After testing the white paint and determining that it was dry I stained the other side using the directions on the can.

Voila a homemade wood photo backdrop.

Photo back drop how to

Over all I couldn’t be more pleased with the results. This was a pretty easy project that I hope will be another step toward improved photography for me.

Now that I’m gearing up for project number 5 I am only getting more excited for this whole thing. I love pushing my limits and committing to doing one unique project a month. I am so happy I started this challenge.

Are you working on any projects that you are excited about? Do you have any unique projects that don’t use the materials I have already used? Please tell me about it all. I want to read all the crafty things!

May 18, 2015 May 13, 2015 Filed Under: 12-12-12, Crafts Tagged With: Projects

Project No. 3 – Making Soap

By Jessica

This post may contain affiliate links. I may receive commissions for purchases made through links in this post.

Mothers Day is coming up and I’m a little short on ideas
right now. When you get to be my age it feels like everything has already been
done. I decided to hit up the local craft store and see if there was anything
that I could come up with for my sister and I to do together.

I found this soap making kit, and thought why not? It’s a
fun idea, and I like the design. It doesn’t look too ridiculously hard, and
everything that I need is right in the box. Before you ask My mother only reads this blog when I send her the link to a specific post, so I’m pretty sure it will be safe until the big day.

The actual hard part of all this was trying to nail down a
time to hang out with my sister in a kitchen un-inhibited and without my mom’s presence.
I did manage to make it work though and we spent a lovely morning with our Gram
busting out this project.

Basically the stock soap is melted, then anything you want to put in is added. We used a mixture of essential oils, apricot seeds and rose coloring that came in the box. My sister had a good time trying to mix the different scents. The mixture is then poured into the molds and left for 45 minutes to an hour. We used a mini muffin tin and suran wrap for some of the excess soap. Really it was that easy.

I think the best part of this project was the ease with which everything was cleaned up. Basically a rinse in the sink was all that it needed, I mean it’s soap after all.

While this project was fun, I don’t think it’s something I’ll want to do all the time. I really like the organic soaps that I get from Filthy Farmgirl, but it was good sister project this time around.  

April 20, 2015 December 5, 2017 Filed Under: 12-12-12, Crafts

Project No. 2 – Ink

By Jessica

This post may contain affiliate links. I may receive commissions for purchases made through links in this post.

Prints are the thing now. 
They are everywhere from etsy shops to major stores, and everyone seems
to have them in their homes.
Somehow I stumbled across this print (I believe it was a blog post). I loved the idea of it and immediately wanted
it for my own kitchen. Roast chicken is near and dear to our hearts. It’s
something I cook almost weekly, with a tired an true recipe that both Chuck and
I love, this print seemed perfect.
The only thing about it that I didn’t like was that it wasn’t
my recipe. I thought having a print that was all mine would be amazing, so I decided
to get to work. It took me a while to figure out a design that I liked, and
then figure out what pens /markers/tools to use. I did a fe side projects to
get comfortable, and then just went for it.

I think it turned out pretty good. I made one small mistake,
but a little white out isn’t noticeable from far away. I could always scan it
into the computer and photoshop it out, but that’s a lot more effort, and
imperfections are part of life. I think it will remain as is for now. Also the matting that I made myself from colored paper is a little off, but I think it adds to the imperfect look; at least that’s what I’m going with for now.

I put it
up in our kitchen where we used to hang a calendar and love opening our door to
it every day now. After Project no. 2 I am even more in love with this
challenge. I hope to fill this house with handmade items, and art. It fills my
heart during the creative process and then seeing these things get use every
day.

March 23, 2015 December 5, 2017 Filed Under: 12-12-12, Crafts

  • « Go to Previous Page
  • Page 1
  • Page 2
  • Page 3
  • Go to Next Page »

Primary Sidebar

  • Facebook
  • Instagram
  • Pinterest
  • Twitter
  • YouTube
Hi, I'm Jessica. I'm an herbalist living in the great northeast with my husband Chuck, our two little boys, our dog Brody and a flock of chickens. I'm all about real, good food and good times with awesome people. I spend a lot of time outside, in my garden, and concocting potions and helping people feel their best. I also like tea, reading, and about a million other hobbies. I'm so happy your here on this adventure with me.

Footer

Copyright © 2026 · Foodie Pro Theme On Genesis Framework · WordPress · Log in