• Skip to primary navigation
  • Skip to main content
  • Skip to primary sidebar
  • Skip to footer

Sweet Love and Ginger

  • Home
  • About
  • Recipes
  • Garden
  • Work With Me

Jessica

Friends & Grilled Tapas!

By Jessica

This post may contain affiliate links. I may receive commissions for purchases made through links in this post.

Over the holiday weekend I was lucky enough to have my good
friend Amanda over, whom I hadn’t seen in roughly 12 weeks since she decided to
run a half marathon, which you can read all about on her blog, Tales of a Married Runner Lady.

Since it had been so long I wanted to keep it casual, and
chatty, we had A LOT to catch up on so I wanted to prepare something that would
not get in the way of that. I decided to go with a kind of tapas menu, It
turned out pretty good, there are a few recipes that were fantastic so I have
to share them. The one thing I would have done different is had a bigger table
outside so I didn’t have to keep running in and out of the house. Oh well, next
time.

Let’s start with the drinks, since tapas, are traditionally
Spanish I figured I should probably make a sangria (those who know me know I
pretty much make sangria for everything and need no excuse).

This is an old standby that I use in impromptu sangria
making situations; the directions are for 1 drink, so just multiply for more.

Quick & Easy
Sangria

1 cup red wine
1 oz dry gin
2-3oz seltzer
2 tsp sugar
1 small handful
frozen mixed berries


Place in a shaker and
shake lightly, pour into a red wine glass and serve.

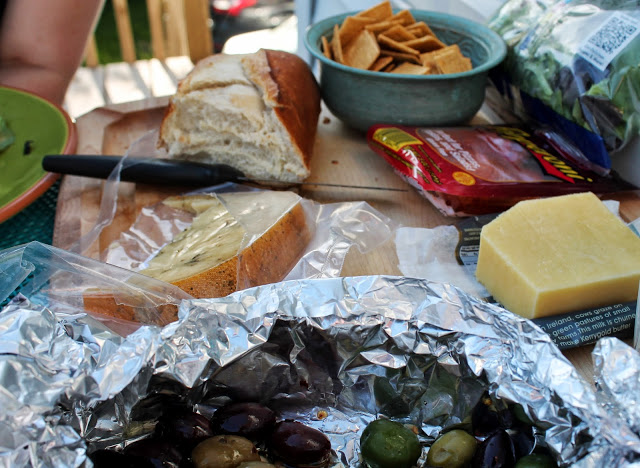
I started with the obvious cheese and crackers, we had this
wonderful cheese that I got from the farmers market in Ithaca the weekend
before. It’s so herby and fresh, I love it. Shortly after the cheese came out
the Grilled Marinated Olives were ready, I also warmed up a small loaf of
sprouted wheat bread on the grill to dip in the olive juices, and it was sooo
good.
Grilled Marinated
Olives

1 cup olive medley
2 tbs extra virgin
olive oil

2 cloves of garlic
minced

1 tsp red pepper
flakes

Salt & pepper to
taste

Combine all
ingredients in a small bowl and toss to coat, transfer to a large sheet of tin
foil. Fold into a packet and place on a preheated grill for 5-10 minutes to
warm.

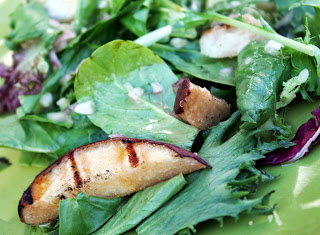
I made a quick Grilled Pear Salad with Shallot &
Vinaigrette Dressing to start us off. The soft red pear was really good and
soft grilled, and the shallot vinaigrette was amazing, so I think I will be
making this a few more times this summer. 

Grilled Pear Salad w/
Shallot Vinaigrette

3 cups mixed greens
1 medium red pear cut
into wedges

1 small shallot,
minced

3 tbsp extra virgin olive oil
2 tbsp Dijon
1 tbsp Honey
3 tbsp Red wine vinegar

Preheat the gril to
medium high heat, and place the pear wedges directly onto the grill. Grill for
roughly 5 minutes per side, or until the pear begins to carmelize. Set aside to
cool for a few minutes, meanwhile in a small bowl whisk together shallot, Dijon,
honey, and red wine vinegar. Pour over mixed greens and toss to coat. Serve
greens topped with grilled pear. (Serves 3)

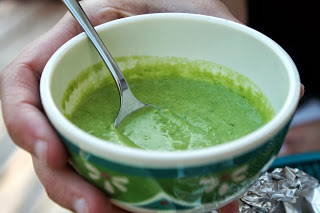
Is there anything more reminiscent of spring than fresh pea
soup? I made a very simple Minted fresh pea soup on the stove top that I kept
in the fridge until serving. 

Minted Fresh Pea Soup

1 tbs chopped onion
1 tbs oil
1 cup peas fresh or
frozen

½ cup chicken or
vegetable broth

1 tbsp fresh mint
¼ cup cream
1 tbs chopped fresh
chives

In a small pan warm sauté
onion in oil for 3-4 minutes or until it begins to soften. Stir in peas and
broth and cook for another 5 minutes. Remove from heat and stir in mint, cream,
and chives. Transfer to a blender and blend until smooth. Add more cream if necessary.
Place in the fridge to chill for 15-20 minutes. Serve chilled with mint sprig
for garnish (Serves 1)

For the protein portion of the meal I grilled up some shrimp
in a quick and easy scampi sauce. It was so quick and easy, I’m thinking that I
might make them up some time to pair with pasta, for a quick and easy week
night meal.

Grilled Lemon Thyme Shrimp
12 medium shrimp, peeled and diveined
1/2 – 1 tbs of oil
2 cloves of garlic
pinch of red pepper flakes
3-4 slices of lemon
Juice from 1 lemon
1 tsp chopped fresh tarragon
2-3 sprigs fresh thyme
Combine all ingrediants in a small bowl and toss. Place in the refridgerator to marinate for 30 minutes. pour out the contents of the bowl onto a large piece of foil and create a pouch. Place on a preheated grill over medium high heat and grill, turning regularly for 8-10 minutes, or until the shrimp are cooked through. Serve warm. (Serves 3)

For the Finale I made a grilled bread pudding. Who would
have thought of such a thing? I stumbled on it somewhere or other and
remembered it when I was trying to think of what to make, so obviously I have
to make it, and I got quite a few compliments, so I think this is another thing
that will be showing up fairly often this summer.

 Grilled Strawberry Bread Pudding
4 slices crusty bread
1 cup cream
1/4 cup sugar
1 tsp vanilla
1 cup sliced strawberries
On a heated grill toast the bread for 2-3 minutes a side, and cut into 1-2 inch squares. In a small bowl whisk together cream, sugar, and vanilla and add bread. Toss the bread in the mixture and pour the entire contents onto a large piece of tin foil. Fold the foil into a packet and place on the grill for 15-20 minutes, turning several times. Remove from heat and toss with strawberries. (Serves 3-4)

Finish it up with some more sangria, and a few laughs and
what could possibly make for a better evening?

June 5, 2013 December 1, 2017 Filed Under: Entertaining, Recipe Tagged With: appetizer, Desert, Menues, Spring, Vegetarian

Dinner 4 One: Linguine with White Clam Sauce

By Jessica

This post may contain affiliate links. I may receive commissions for purchases made through links in this post.

Some days you just need a little loving.
Or maybe you just need to love yourself.
I firmly believe that good food feeds your heart, mind, and soul.
Last Minute Linguine with White Clam Sauce
I take so many comforts in the food that I make; Chicken and Dumplings when I’m sick, tea, for just about anything, and homemade chicken parmesan or pizza melts my heart every time. Out of the box mac & Cheese is the best thing ever for hangovers, especially when its topped with taco meat, tomatoes, and shredded cheddar cheese, or chili. Seafood lifts my spirits, and aids with my celebrations.
It’s truly shocking that I have never learned to make  with clam sauce. I mean if you were to ask Chuck what my favorite food was he would probably say that because I order it every single time we go anywhere it is offered.
I don’t know why but in my mind it was far beyond my capabilities, and to be honest to make it good from scratch with whole real clams can be quite a big undertaking, but from a can on the other hand, that’s definitely possible.
 Last Minute Linguine with White Clam Sauce
You probably know cooking anything (aside from beans or tomatoes) out of a can for me is a little unnerving, but I saw a can of clams in clam juice at the store next to the tuna, and I’m pretty sure my heart stopped. They actually can this sh!t!? Hell Yes they do. I brought them home that night and after reading through the classic recipe for Linguine with clam sauce that I had I decided to make a similar version using the canned clams.
After the rough and hectic day that I had this was just what my soul required, and now you will always find a can of clams hanging around the house, for those days when I need a little loving.
Last Minute Linguine with White Clam Sauce
Prep time: 5 mins
Cook time: 20 mins
Total time: 25 mins
Serves: Serves 1
Ingredients
  • 1-2 tablespoons of Extra Virgin Olive Oil
  • 2-3 cloves of garlic, smashed
  • 1 tablespoons unsalted butter
  • 2-3 clovs of garlic, sliced
  • ½ teaspoon red pepper flakes
  • 1 teaspoon pepper
  • 1 can clams, with juice
  • 2 oz linguine, cooked aldente
  • ¼ cup parmesan cheese
  • 1 tablespoon chopped parsley
  • 1 tablespoon chopped oregano
Instructions
  1. Coat the bottom of a skillet with garlic, and sauté the smashed garlic cloves over medium-high heat.
  2. When the garlic becomes golden and aromatic, about 3-5 minutes, remove it from the pan and discard.
  3. Add the sliced garlic, butter, pepper and red pepper flakes to the pan, also add additional oil if necessary. Sauté for 2-3 minutes or until the garlic just begins to brown.
  4. Stir in the canned clams with juice, and cook for 5-6 minutes, allowing the liquid to reduce slightly, and the clams to cook.
  5. Add the cooked pasta and toss, while still over the heat, this will help the sauce adhere to the pasta.
  6. Remove from heat and top with parmesan cheese, oregano and Parsley.
3.3.3077
For those of you who may not like the “green things” on top of the dish, in this case I strongly suggest that you give them a shot; mix them in with the cheese and the pasta, they give it another dimension of
flavor. I’m telling you!!

Related Recipes:

Scallop Carbonara

Scallop Carbonara

Tomato Sauce From Scratch

Tomato Sauce From Scratch

Shrimp & Sun Dried Tomato Cream Sauce

Shrimp & Sun Dried Tomato Cream Sauce

May 30, 2013 January 4, 2017 Filed Under: Recipe Tagged With: Dinner 4 1, Pasta, Quick & Easy, Seafood

scallop carbonara

By Jessica

This post may contain affiliate links. I may receive commissions for purchases made through links in this post.


I haven’t made carbonara in a while and the other night, after my grilling plans went out the window due to rain, I just needed to be made. It’s super easy, and perfect for light fresh summer food. Plus as you may already know Chuck has a Parmesan cheese obsession, so of course he loves it when I make carbonara. I chose to add scallops because I had them in the freezer from a great sale a couple days before, and they defrost quickly.

I also made a pretty hearty salad while we waited for the scallops to defrost to ensure we got our vegetables in. One cannot have a meal without vegetables in our house.

I wasn’t planning on posting it, but I think this may very well have been the best carbonara I have ever made, so basically I HAVE to share.


Scallop Carbonara


6 slices thick cut bacon, diced

1 lb spaghetti

1 tbs olive oil

2 shallots, sliced thin
>

1 tsp fresh ground pepper

1 lb bay scallops

3 eggs

1 cup parmesan cheese

1 tbs minced parsley for garnish


Heat a skillet over medium high heat, and cook bacon until it begins to crisp.

Meanwhile bring a large pot of water to a boil, and cook pasta until aldente, reserving 1-2 cups of pasta water.

Discard bacon drippings, and stir in shallot, oil, and pepper. Sauté until the shallot begins to soften,
roughly 2 minutes, and stir in scallops. Continue to cook until scallops become opaque, and firm, roughly 5-7 minutes, and then remove from heat.

In a small bowl whisk eggs, and cheese together. Whisk in 1 cup of lightly cooled reserve pasta liquid.

Add pasta and egg sauce to the skillet and toss. If it is dry add a little more liquid, and adjust seasonings.

Serve warm topped with sprinkled parsley (serves 4)

May 24, 2013 July 26, 2018 Filed Under: Recipe

A Weekend in Wine Country & French Onion Casserole

By Jessica

This post may contain affiliate links. I may receive commissions for purchases made through links in this post.


So last weekend, I FINALLY made the trip out to visit one of my good friends from college in Ithaca NY. It was a blast! Brody and her 1 year old puppy Baxter are now pretty much best friends.

This is in the heart of NY Wine Country, so of course we drank a little wine, visited a few waterfalls, and went to farmers markets. It was great just being able to catch up and playing with our pups. They were so spoiled the whole time. They had all kinds of fun on nature trails at the dog park, and just in the back yard. Little Brody was so tired that he slept the whole way home, and then for the next 2 days as well. The little guy was barely playing at the end of it, but he would not take a nap no matter how hard I tried.
 
Now while I was gone I wanted to leave Chuck with a hearty dish that he could eat over the weekend, and thought a casserole would be perfect. I wanted something French Onion style but aside from green bean casserole, and minimalist French onion casserole there was really nothing, and definitely nothing hearty enough to keep Mr. Meat and Potatoes satisfied for an entire weekend.

So of course I improvised.
I still wanted something meatless (generally speaking) because of this whole quest thing that I have been on to make vegetables our main focus, but I added some pasta (surprise!), and a few vegetables that I thought would go well with the flavors. These made for a pretty hearty casserole in my opinion, and considering that Chuck now wants me to make it once a week I think it was a hit.

French Onion Casserole
3-4 large onions, sliced thin (I used white & yellow)
1 tbs oil
1 tbs butter
1 tsp salt & pepper each
1tsp thyme
2 tbs flour
1 large carrot, shredded
2 cups of beef (or vegetable)broth
(1 tbs soy sauce if using vegetable broth)
1 cup frozen peas
1 ½ cups frozen French cut green beans
1 lb pasta, cooked aldente
¼ cup shredded mozzarella cheese
2/3 cup shredded gruyere cheese
Sprinkle parmesan cheese
In a large thick bottomed sauce pan heat oil and butter, and layer in the onions with salt & pepper. Sauté, onions for 1-2 minutes, until the edges begin to brown, and reduce heat to medium-low and cook for 20-25 minutes stirring occasionally until the onions have become caramelized. Bring the heat up to medium high and stir in the thyme, carrots and flour. Continue to stir for 1-2 minutes until well blended, and deglaze with broth. Allow the broth to simmer for 3-5 minutes, while stirring and scrapping browned bits from the bottom of the pan. As the sauce begins to thicken mix in peas and green beans and cook until they have softened. In a large baking dish toss together the vegetable mixture and cooked pasta. Top with both mozzarella and gruyere cheeses, and sprinkle parmesan on top. Place in a preheated oven at 400 degrees and cook for 15-20 minutes, or until the cheese is melted and bubbly. Serve warm.

May 22, 2013 December 1, 2017 Filed Under: Recipe Tagged With: Camping/hiking, Travel, Vegetarian

D41: Baked Chicken Risotto

By Jessica

This post may contain affiliate links. I may receive commissions for purchases made through links in this post.

Since moving out, and trying to adopt a healthy lifestyle, I
have found that it helps to keep leftover shredded chicken in the freezer.
Having it on hand makes so very many meals easily through together on a whim,
or if I happen to have an unexpected guest.

That where this recipe came from. I had roasted a whole
chicken and found out that Chuck had to go out of town the whole week, and an
entire chicken to freeze is a little more than my tiny freezer can handle, so I
made some Pesto Chicken one night, and a variation of this baked
chicken risotto I saw on Giada at Home, with a few alterations of
course.

In her recipe there are a lot of additional ingredients, but
for mine I stuck with just what I had on hand, simply to avoid a trip to the
store. If you don’t have already roasted vegetable leftovers it’s not a big
deal, you can always toss in your choice of frozen veggies, or roast some up
first.

This recipe is actually great for any size family, if you
simply multiply the ingredients. Also if you wanted to make it a one pan
wonder, simply use a Dutch oven or oven safe pan from start to finish. I only
used 2 pans because I really wanted to use the single serving dishes I just
got, and I know that not everyone has a pan the right size for this sort of
thing.

Leftover Baked
Chicken Risotto

½ tbs olive oil
½ tbs butter
2 tbs onion, chopped
¼ cup Arborio rice
¼ cup cooked chicken, chopped
¼ cup roasted carrots and parsnips chopped
2-3 cups chicken broth
1-2 tbs parmesan cheese
1 tsp Fresh chopped chives for garnish

Preheat oven to 375. In a small thick bottomed pan heat oil
and butter over medium high heat. Sauté onion until it begins to turn
translucent and tender (1-2 minutes). Stir in rice and cook and additional 2-3
minutes, as the rice begins to brown. Add additional vegetables, chicken and
broth. Cook for 2-3 minutes, stirring continuously. Pour contents into an oven
safe pan and bake for 15-20 minutes, or until the creamy, and the rice is
nearly cooked (you still want it to be slightly firm to bite). Stir in parmesan
cheese, top with chives, and serve warm.


May 20, 2013 December 1, 2017 Filed Under: Recipe Tagged With: Chicken, Dinner 4 1

  • « Go to Previous Page
  • Page 1
  • Interim pages omitted …
  • Page 148
  • Page 149
  • Page 150
  • Page 151
  • Page 152
  • Interim pages omitted …
  • Page 171
  • Go to Next Page »

Primary Sidebar

  • Facebook
  • Instagram
  • Pinterest
  • Twitter
  • YouTube
Hi, I'm Jessica. I'm an herbalist living in the great northeast with my husband Chuck, our two little boys, our dog Brody and a flock of chickens. I'm all about real, good food and good times with awesome people. I spend a lot of time outside, in my garden, and concocting potions and helping people feel their best. I also like tea, reading, and about a million other hobbies. I'm so happy your here on this adventure with me.

Footer

Copyright © 2025 · Foodie Pro Theme On Genesis Framework · WordPress · Log in