• Skip to primary navigation
  • Skip to main content
  • Skip to primary sidebar
  • Skip to footer

Sweet Love and Ginger

  • Home
  • About
  • Recipes
  • Garden
  • Work With Me

Crafts

A Tiny Blanket for a Tiny Lady

By Jessica

This post may contain affiliate links. I may receive commissions for purchases made through links in this post.

Recently Chuck and I were lucky enough to become God Parents to our sweet little niece. For the occasion, I took the time to hand make her a small blanket.

Tiny Blanket

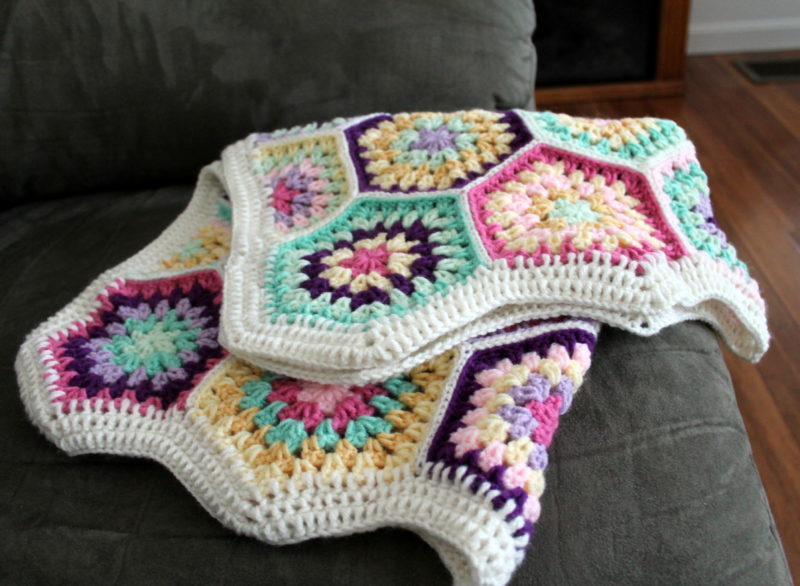
At roughly 2 feet by 3 feet it is one of the smallest blankets I will probably ever make, but it’s also a great size for a small baby. As she grows it can transition to the perfect size stroller or lap blanket and if it makes it through the rough childhood years it could be used as a wall hanging.

Tiny Blanket

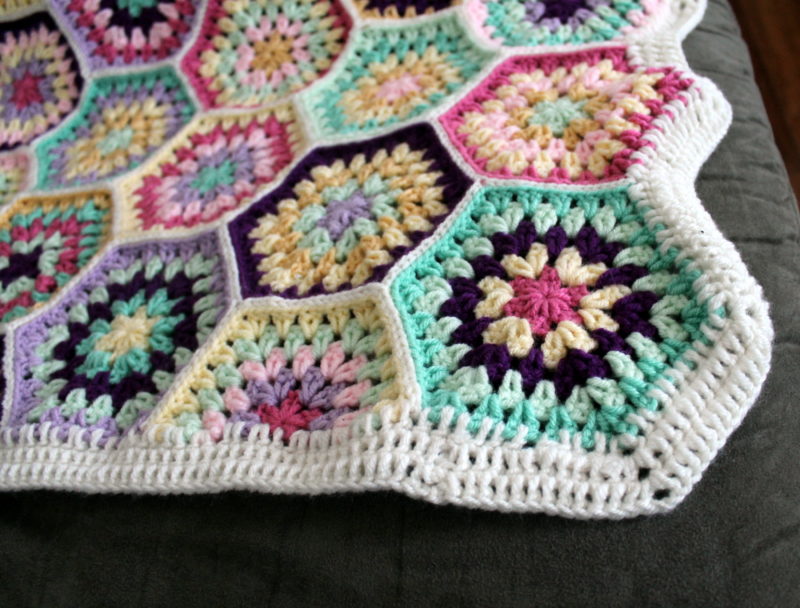
The blanket is made up of 23 hexagons, 4 half hexagons, and 3 rows of edge stitching. I really only used a double crochet, single crochet and a flat stitch to combine all the separate patches. I made sure that no two hexagons are alike and no pattern shows up more than twice. Altogether there are 9 colors including the white edging. To come up with the color scheme I used two shades of yellow, pink, teal, and purple. I think combining the light and darker shades of the colors makes for a more dynamic look.

I’m really proud of how this blanket especially since it is the first blanket that I have made and given away. It was a great experience that I hope to repeat again soon.

Tiny Blanket

May 16, 2016 May 16, 2016 Filed Under: Crafts

12-12-12 Project Wrap Up

By Jessica

This post may contain affiliate links. I may receive commissions for purchases made through links in this post.

IMG_7154

A year has gone by and the 12-12-12 project is complete. I may be short by one project but sometimes that’s just how it goes. I have started a number of projects that were originally sparked by this challenge that I’m hoping to post soon. I just can’t seem to get them all done in the allotted time. I suppose that’s what happens when you take on a challenge like this the same year that you get married, and buy a house.

For this challenge I re-taught myself to knit and crochet, built a wooden back drop, put together a photo book, learned to wood burn, made soap with my sister, made a dream catcher, designed and created a print that still resides in my kitchen, made a ribbon belt for my wedding (also saving a bunch of money on it), glued and cut felt to make a garland, carved and hand stamped my own napkins, and played with rocks.

IMG_7027

As far as challenges go I’m pretty pleased with this one. I was forced to thing outside the box and push my comfort zone and do a number of things I don’t think I would have otherwise. Of course I’m disappointed that I didn’t complete all 12 projects, but I’m letting it get to me. I finish way more than 12 projects this year, but many could not be counted toward this project because they were too similar to others. For example I completed a number of hats, scarves and blankets either knitting or crocheting, which was also the first project I completed with this challenge.

Hand Stamping

The challenge was able to spark a slew of creative ideas and projects for me, which was the whole goal anyway. With that I am happy, and I’m also happy to release the pressure of coming up with and completing a project each month. For someone with a full time job, and a blogging side hustle it was a lot more work than I anticipated.

IMG_8009

For 2016 there will be no more craft projects, since we have a number of house projects and travel plans in the works. That’s not to say that craft projects won’t still appear here on the blog, but they won’t be in the restricted fashion that’s required of a challenge.

February 15, 2016 December 5, 2017 Filed Under: 12-12-12, Crafts

A Photo Book Project

By Jessica

This post may contain affiliate links. I may receive commissions for purchases made through links in this post.

This is Project No. 11 in my 12-12-12 Series, this time I utilized photos.

IMG_9269

I had a lot of plans to do things with photos while during this project. I even went out and bought a scrap book, paper, printed pictures and the whole 9 yards. Then I spent about an hour working on it before I lost all interest. I decided to take a different approach and go with a printed book instead.

Putting together this book was so much easier on a computer screen. I could mess with the layouts as many times as I wanted, add words without my horrible handwriting screwing it up, and even add cool layers and frames to the photos. And I didn’t even have to spend a bajillion (technical term there) dollars at the craft store on things like paper, stickers and fancy scissors.

A Photo Book Project

I had it printed 8×10 because that is the size of the book that was given to us by our photographer. Ideally I would love to have a little collection of books that I can look back on over the years to remember our lives together. It will be fun for us to look back, laugh at out fashion choice and reminisce about all the fun times that we had.

This book starts when we met, way back in college and includes some of our college adventures then moves forward through our first place together, traveling to Ireland adopting Brody, and finally our engagement. There are of course a scattering of some of my favorite photos of us, our adventures and our friends.

I really liked this project and already have plans for the next photo book, which I will create in the fall I’m hoping to use to commemorate our first year of marriage.

I used Shutterfly, but you can get these books from CVS, Artifact Uprising, and numerous others.

January 18, 2016 January 18, 2016 Filed Under: Crafts

Felt Ornament Garland

By Jessica

This post may contain affiliate links. I may receive commissions for purchases made through links in this post.

This is Project No. 10 in the 12-12-12 series.

IMG_9043

I had big plans to paint or make really nice ornaments for our tree this year, but that just isn’t happening since I’ve realized that we have a million ornaments and no other decorations. Not that I’m really one to want a ton of decorations but considering that this coming weekend we are hosting two holiday events at our home I thought it might be pertinent to have a few other things scattered around.

I picked up a felt ornament kit at Micheals on a whim and decided to make them to hang in the kitchen. It was ridiculously easy, and After making half of the ornaments in the kit I already had more than I needed. I think this would make a great and super inexpensive project to do with kids.

IMG_9045

I thought this project was a little too easy to really count in this series, but this month has been so crazy that it’s the only craft project that I actually completed so I decided to post it anyway. Again its a great inexpensive project for kids or for those who like me are looking for low budget decorations for the holiday season,

December 21, 2015 December 5, 2017 Filed Under: 12-12-12, Crafts

Hand Stamped Linen Napkins

By Jessica

This post may contain affiliate links. I may receive commissions for purchases made through links in this post.

This is project number 9 in my 12-12-12 Series. This project involves hand carving rubber to create stamps for custom stamped linen napkins. 

Hand Stamping

Once in a while you hit it big, that’s something that the above picture did for me yesterday. I posted to instagram on a whim thinking this light is cool and I havent posted in a while. Well It went viral (for me that is), getting roughly 4 times the likes of any instagram post ever. If someone could tell me what it is about this picture that made it so popular that would be great.

I digress you are here to read about my most recent project right?

 Hand Stamped Linen Napkins

I had this project on my mind for a while. In fact I bought the stuff to make it way back in June, however as you can probably guess life took over, I lost the kit in the move for a while and so I never got to actually do anything with it until now. I really liked this craft and I definitely believe that it is something I would do again, probably in the near future, when I get an actual dinning room table (finger crossed we find one we like soon!).

This project was pretty easy so I thought I’d break it down into simple steps for you.

  1. I bought this kit (Speedball Speedy Carve Stamp Making Kit).
  2. Next I drew the design that I wanted and carefully carved it with the tools in the kit and used scissors to cut out the final design.
  3. I used fabric paint and a cheap foam roller from the craft store to roll the paint onto the stamp.
  4. Carefully placed the stamp onto the fabric and applied light pressure.
  5. Once dry I ironed the fabric where the stamp was placed and tossed it into the wash to make sure it had set.

Hand Stamped Linen

I was really happy with how these turned out. I like the kind of worn in look that they have and think that they will go great in my dining room, once it’s back together. The napkins I bought in white from your typical box store, since I didn’t want to spend to much money on this first trial run. The next napkins will probably be on a littler better quality linen.

Have you been working on any new projects lately? I need some ideas for the last few projects in this series and I’d love to see what you guys are into.

Check out my other craft projects here.

November 30, 2015 November 30, 2015 Filed Under: 12-12-12, Crafts

  • Page 1
  • Page 2
  • Page 3
  • Page 4
  • Go to Next Page »

Primary Sidebar

  • Facebook
  • Instagram
  • Pinterest
  • Twitter
  • YouTube
Hi, I'm Jessica. I'm an herbalist living in the great northeast with my husband Chuck, our two little boys, our dog Brody and a flock of chickens. I'm all about real, good food and good times with awesome people. I spend a lot of time outside, in my garden, and concocting potions and helping people feel their best. I also like tea, reading, and about a million other hobbies. I'm so happy your here on this adventure with me.

Footer

Copyright © 2025 · Foodie Pro Theme On Genesis Framework · WordPress · Log in