• Skip to primary navigation
  • Skip to main content
  • Skip to primary sidebar
  • Skip to footer

Sweet Love and Ginger

  • Home
  • About
  • Recipes
  • Garden
  • Work With Me

Jessica

Adventures in re-propagation

By Jessica

This post may contain affiliate links. I may receive commissions for purchases made through links in this post.

I have experimented with all kinds of re-propagation over
the last couple years. I even had a super successful celery plant that I re-grew
from a stalk; it lasted for 2 years before it got some kind of gross bug that I
couldn’t get off easily. I mean that thing seriously hooked itself to the
plant, and there were probably 30 of them, it was gross. I had to let it go for fear of my other nearby plants.

I’m starting to re-propagate some other plants this year in an
attempt to have fresh food through the winter. I am also going to try a winter
indoor garden, but that’s another post.
I should probably mention our pineapple plant. Chuck has
been trying to grow these since college, and his dad was able to get one to
root for us. We have had this thing for about 3 years. I have read that it
takes close to 5 in order to get them to bear fruit. So I’m not expecting much
from it any time soon.

For starters there were the scallions. I have had good luck
keeping these bad boys alive for month on end, and just sniping off the green
parts as needed, however no matter how many times I rinsed the roots, and
changed the water, after a few months they always ended up slimy and moldy.
This time around I decided to place them in a small pot after the roots grew a
little bit and viola! They have lasted mold free for nearly 6 months. No
complaints here.
I may try to do the same with some leeks and fennel this
winter. I would love to have those on hand fresh.

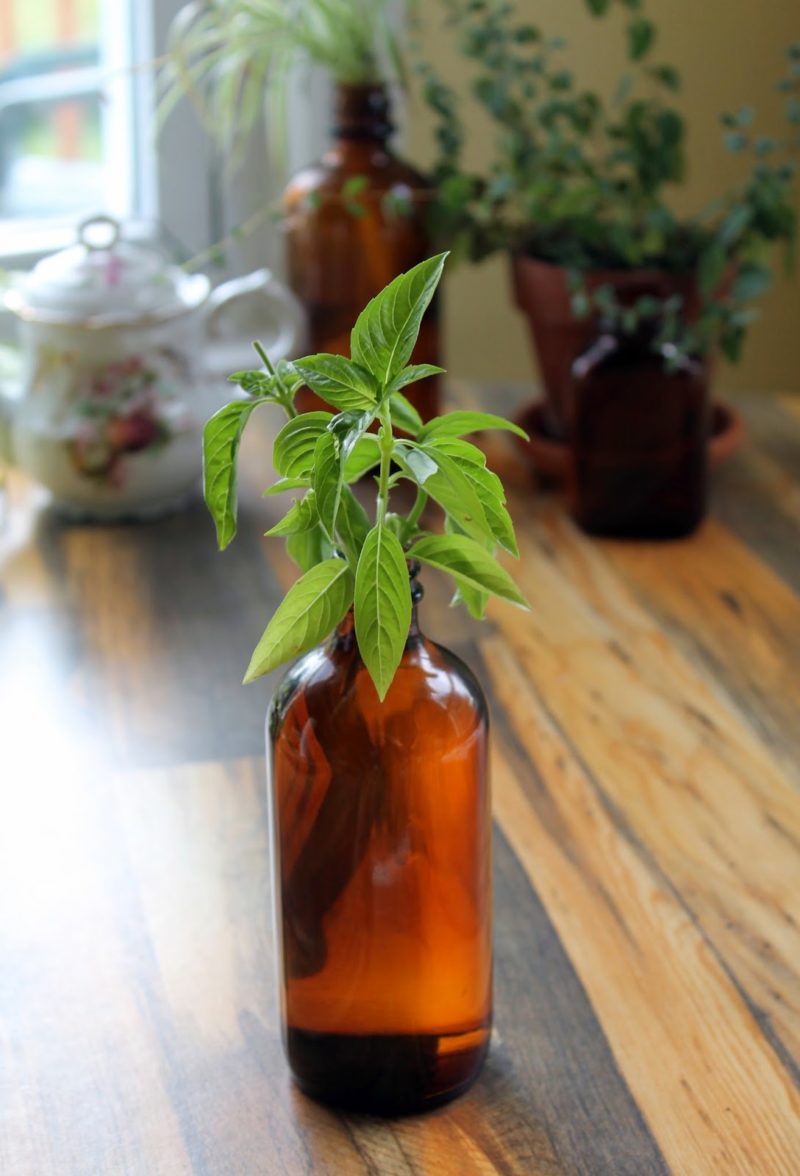
Basil is something I have had great success with. Pretty
much any basil cutting will grow roots in less than a week. It’s amazing how
fast they grow. Once they have roots you can place them in soil and they will
grow just like normal. I now have 10 basil plants that I started from just 2.
I have tried to grow ginger, but it can be a bit finicky
with our cold temperatures, so my plant only lasted about 9 months.
I have never had success growing garlic from grocery store
bough garlic; once the greens grow no more bulbs seem to form. I don’t know
whether there is a chemical they put on them that causes that or what; however I
have had success with bulbs from my mother’s garden.
I have had some success with lettuce re growth, but I never
made it to soil with the plants. Right now I have 2 sets of lettuce trying to
grow roots that I can hopefully put in soil in a few more days. I’ll be back to
let you know how that goes.


PS: I just started a monthly newsletter and I would really really love it if you signed on. I promise not to spam you! It’s just a once a month newsletter with my top posts from the month, some posts of things I have done elsewhere on the internet and whatever announcements I have. Seriously Join it. I’m begging you! 

#mc_embed_signup{background:#fff; clear:left; font:14px Helvetica,Arial,sans-serif; width:200px;}
/* Add your own MailChimp form style overrides in your site stylesheet or in this style block.
We recommend moving this block and the preceding CSS link to the HEAD of your HTML file. */

September 15, 2014 December 5, 2017 Filed Under: Garden Tagged With: Indoor Plants

Yellow Tomato Jam & Learning to Can

By Jessica

This post may contain affiliate links. I may receive commissions for purchases made through links in this post.

I’ve mentioned before, rather recently in fact that my tomato
plants have gone a little nutty. A few of them are even taller than I am, and
they are producing a lot. I never realized how many tomatoes you could actually
get from one single plant let alone the 3 that I have.
I decided to try a canning experiment this year, since the
tomatoes are abundant and everyone knows how much better home grown tomatoes
are. I of course went to seek the oh so wise words of the internet for a good
recipe and method for canning these little babies, and settled on this recipe
from Food in Jars.
I made about 1/3 of the prescribed batch, and the recipe for that
is listed below. The sauce was amazing and the spare can I left out for tasting
was gone in minutes. I’m sure this would be a great pairing for scones at a tea
party, or mixed with cream cheese at a cocktail party. It’s pretty versatile and
totally delicious.
Yellow Tomato & Basil Jam
1 1/3 pounds Sungold tomatoes, halved
1 cup sugar
3 tablespoons lemon juice
Zest of ½ a lemon
1 ½ tablespoons basil, chopped
Toss the tomatoes with sugar in a large bowl. Let them sit for an
hour or more and allow their juices to release. In a thick bottomed sauce pan add
tomatoes, their juices and lemon juice. Bring to a boil and cook for 30 minutes
stirring continuously, until the sauce becomes thick. Remove from heat and stir
in lemon zest. Can immediately, or allow the sauce to cool and serve. The sauce
will store for up to one year in sealed jars.
I used the water bath method for canning, which I have seen Miss
Amy do about a million times, though she usually prefers large batches. I think
this method of just sticking leftovers into the water bath while I’m cleaning
up dinner is a method that will work for me. There are always leftovers with it
just being me and chuck around here, and this is a great way to get that
amazing flavor year round, and stay a bit greener, which is always a bonus.

Since I am not an expert yet, (yes, I plan to one day be) I don’t
think my experiences are enough to go by to tell you how to can things
properly. Besides I don’t want anyone to get botulism on my account. I suggest
using this website for the canning basics, it is a wealth of information.

September 12, 2014 January 29, 2018 Filed Under: Recipe Tagged With: Canning, Condiment, Make Ahead, Natural Living, Vegan, Vegetarian

Simple Burst Sun Gold Sauce

By Jessica

This post may contain affiliate links. I may receive commissions for purchases made through links in this post.

So. Many. Sun Golds.

Aren’t they beautiful? They are so sweet and delicious. I’m
thinking of all kinds of ways to use them in all kinds of recipes. This one so
far is one of my favorites.
This is probably the simplest sauce I have ever made. I don’t
even know if you can call it a sauce, since it’s pretty chunky, but it lent
itself well to pasta so I guess it’s a sauce. I just had so many sun golds that
were supremely ripe and ready to be devoured so I decided to roast them, easily
with some flavor boosters and because I like them in their oozy burst state I
decided not to blend them. Again so easy.  

I’m sure this recipe would work with nearly any type of
tomato, but I like the bright color and super sweet taste in these babies.
For the ravioli I made those about as simple as possible. I
have been experimenting with varying pasta dough recipes to find my favorite. I
used this recipe this time around and found it to be difficult to work and
a bit dry, but that could have also simply been the heat in this tiny kitchen
in the summer. The filling was plain old ricotta, with nothing else, again because
we were going simple here. I also served it with a Pinot Grigio for good measure.
I’m thinking that this sauce at least may make itself into
rotation for our dinner parties, it’s just too easy. We might even have to try
it over some chicken, or with rice or something. Experiments are always fun.


Burst Sun Gold Sauce (Serves 4)

1 quart sun gold tomatoes
½ a medium red onion, sliced thin
Salt & Pepper to taste
2 tbsp extra virgin olive oil
4-5 sprigs of thyme
Chopped basil for garnish

Preheat the oven to 375. Combine tomatoes, onion, salt,
pepper and oil in a large baking dish. Toss well to combine and spread evenly. Bake
in the oven for 35-40 minutes or until the tomatoes begin to burst, and release
juices. Remove from oven and serve immediately.

September 10, 2014 February 12, 2018 Filed Under: Recipe Tagged With: Clean, Condiment, Summer, Vegan, Vegetarian

A Love Letter to Tea

By Jessica

This post may contain affiliate links. I may receive commissions for purchases made through links in this post.

Growing up my grandmothers (yes both of them) always had tea
water ready to go. It was the thing you were offered the second you walked
through the door, finished a meal, or woke up. It was the thing you drank for
headaches and heart aches alike. It was the thing that fixed everything.
In my own home I’m still an avid tea drinker. I enjoy strong
black Scottish and Irish tea’s as well as light herbal mixes, depending on my
mood. I’ve had a great many debates with people on the best ways to serve and
prepare tea, but in all honesty it’s entirely up to the person enjoying their
own cup.
Tea has a place in my heart that very few things have. I
remember all the serious conversations with family, while cups turned cold in
our hands, as well as settling down to fettering out my own life thoughts with
a freshly brewed pot.
It has quelled my deepest coughs, relieved stuffy noses,
soothed my strongest headaches, and even helped put me to sleep in the long
years when it evaded me the most. It’s always been there when I needed it and I
know that it will continue to be, just like it has for thousands of years.
It’s interesting to think about those ancient days when man
was first began steeping tea leaves, flowers and pine needles in fire heated
water. Did they marvel at the strength it gave them, or the ailments it
soothed? Or did they simply enjoy the warmth it provided?
Tea is an ancient comfort that has spread it’s love across
millions of lives, and continues to fight for honest and true health. Perhaps
we should all remember what it has done for us in our time and give a moment of
thanks for its ancient power.
Sincerely,

Jessica

September 8, 2014 December 5, 2017 Filed Under: In My Head Tagged With: Tea

Apricot Pork Kabobs

By Jessica

This post may contain affiliate links. I may receive commissions for purchases made through links in this post.

 A quick and easy recipe for Apricot Pork Kabobs, that is a fun and flavorful for summer.
Apricot Pork Kabobs
Sometimes I get stuck in a rut when it comes to pork. I can dress it up Asian style, or with apples (such as here, and here), but other
than that I always seem to fall back on the simple rosemary and garlic staple, or shake & bake that I know a lot of us in the north east grew up with. I
have been trying to break that mold lately and it’s working out surprisingly well.
This recipe is so far one of my favorites. With only 4 ingredients it comes together super quick, and super inexpensive. Here it is
made for the grill, but it can just as easily be broiled in the oven as kabobs or even a whole loin. I did notice that the final product need extra sauce, and that some people (think Chuck) liked to use the sauce to dip their veggies in, so this recipe makes enough for that as well.

As for what to serve with it, the options are pretty much endless. A big green salad is perfect, since the sauce can act as a dressing,
and it goes wonderfully with blue cheese crumbles. Basically swap out the barbecue chicken in this recipe for these kabobs. I have also served it with simple roasted potatoes, or you could try a basic rice pilaf like this one. Since there is so much flavor in this recipe I think basic sides are a good
option.

Apricot Pork Kabobs
Prep time: 30 mins
Cook time: 15 mins
Total time: 45 mins
Serves: 4 Servings
Ingredients
  • 6 oz apricot preserves
  • 1 1/2 tbsp low sodium soy sauce
  • 1 tsp ground garlic
  • 1 lb pork loin, cut into fist size pieces
Instructions
  1. In a small sauce pan over medium heat add preserves, soy sauce, and garlic and stir well to combine. Cook for 1-2 minutes or until the preserves have liquefied and the sauce has thickened.
  2. Remove from heat and pour about 3/4 of the sauce over pork, reserving the rest and cover.
  3. Let the pork marinade for about 30 minutes (up to 1 hour) before placing it on pre-soaked wooden skewers.
  4. Place kabobs on a preheated grill over medium high heat for about 3-4 minutes per side basting with leftover marinade.
  5. Once cooked through remove from heat and baste with reserved marinade. Serve warm with reserved sauce on the side.
3.3.3070
PS: Check out my newest post over on the Charming Blog; 10 Super Easy ways to Eat Healthier Now without Trying too Hard

September 3, 2014 January 29, 2018 Filed Under: Recipe Tagged With: Pork, Summer

  • « Go to Previous Page
  • Page 1
  • Interim pages omitted …
  • Page 117
  • Page 118
  • Page 119
  • Page 120
  • Page 121
  • Interim pages omitted …
  • Page 171
  • Go to Next Page »

Primary Sidebar

  • Facebook
  • Instagram
  • Pinterest
  • Twitter
  • YouTube
Hi, I'm Jessica. I'm an herbalist living in the great northeast with my husband Chuck, our two little boys, our dog Brody and a flock of chickens. I'm all about real, good food and good times with awesome people. I spend a lot of time outside, in my garden, and concocting potions and helping people feel their best. I also like tea, reading, and about a million other hobbies. I'm so happy your here on this adventure with me.

Footer

Copyright © 2026 · Foodie Pro Theme On Genesis Framework · WordPress · Log in