• Skip to primary navigation
  • Skip to main content
  • Skip to primary sidebar
  • Skip to footer

Sweet Love and Ginger

  • Home
  • About
  • Recipes
  • Garden
  • Work With Me

Baked Eggplant Parmesan

Baked Eggplant Parmesan

By Jessica

This post may contain affiliate links. I may receive commissions for purchases made through links in this post.

Baked Eggplant Parmesan

Spring is finally showing its face around here and while I’m excited to see the flowers poking their heads out and to hear the birds singing, I’m also pretty damn exhausted. Just being honest.

Getting garden beds prepped, spring time household chores, work and a hectic social life have been taking their toll on me. Don’t get me wrong there’s a lot of good happening here it’s just a lot and all at once.

While I love being busy and social at the core I am an introvert. I need some quiet time alone once in a while to recharge my batteries so to speak and this is one of those seasons where it does not happen often.

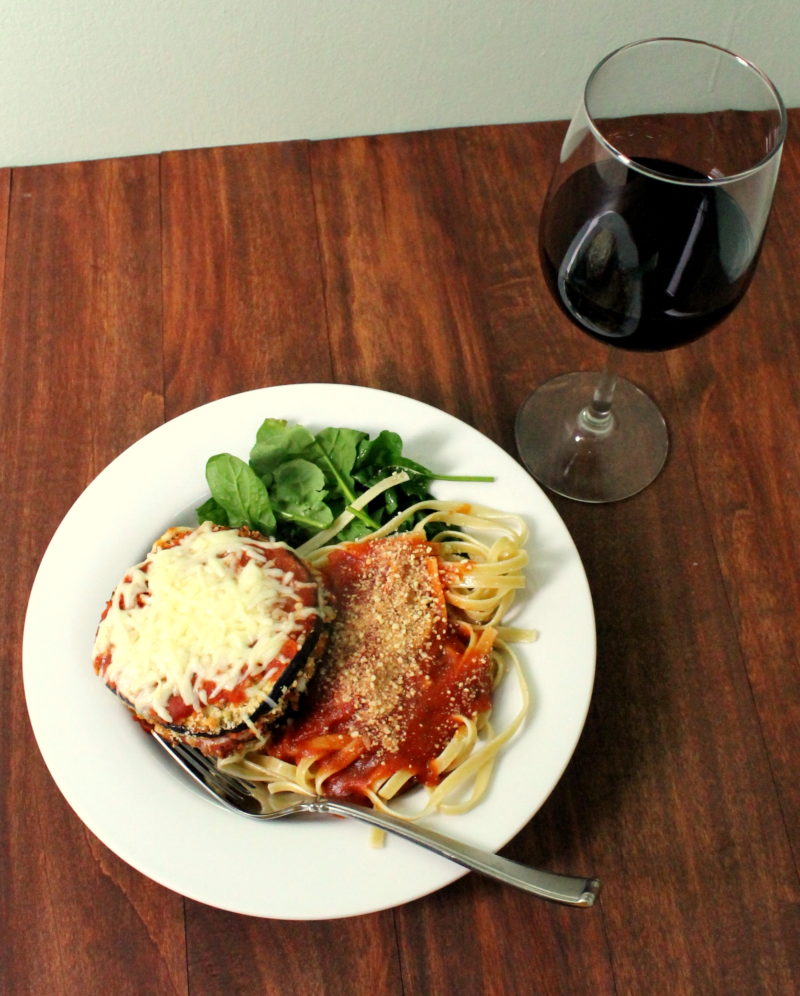
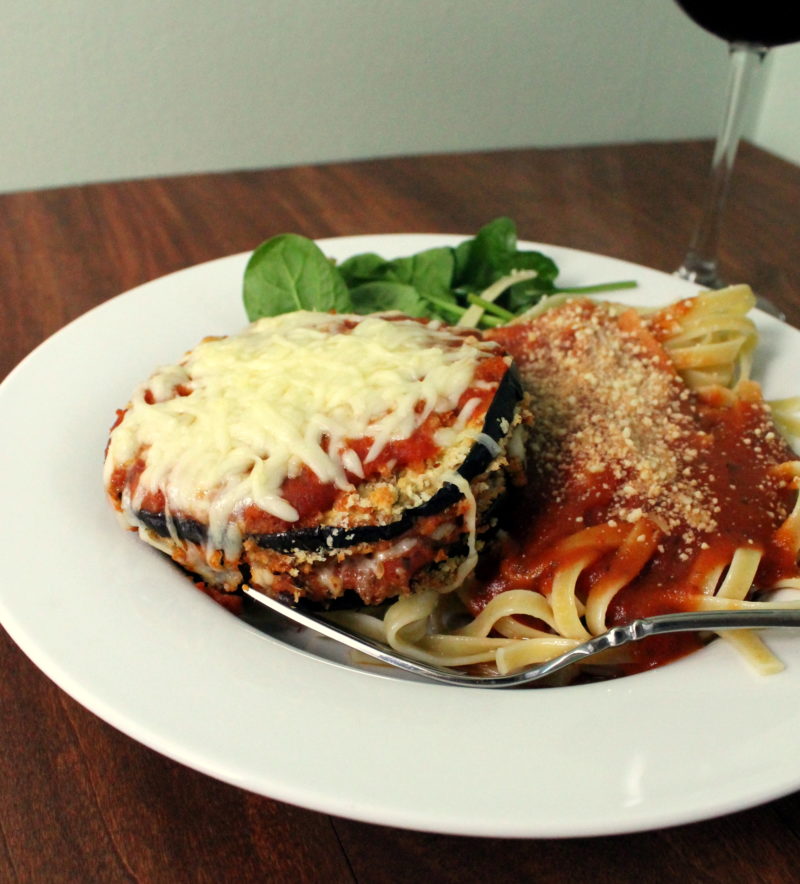
There was one night last week that I did, by some random miracle, get an entire evening on my own. What did I do with this evening you ask? I made Eggplant Parmesan with homemade sauce.

There is something so relaxing to me about making a meal that takes a little more time and effort than the usual week night dish that just seems so healing to me. It’s like I am saying to myself and to my body that yes you are worth it. You are worth the time to prepare this meal, this nourishing homemade meal from scratch. You are worth it.

Baked Eggplant Parmesan

In today’s society we are all about convenience and food that is quick and easy, while not necessarily being nourishing. With this behavior I have to ask what is it that we are telling our bodies? What are we telling ourselves with this kind of mentality? In my mind we are telling ourselves that we are not worth much if we can take 10 minutes to eat something more than what we can get from a drive through window. We get one shot on this earth with one body and I don’t want to cram it full of sub-par fuel.

Despite this hectic time of life I’m going to take a moment a little more often to cook more food that nourishes not only my body but my soul. I want to cook the types of food that remind me that I am worth the time and effort to make something not only delicious but healthy. I’m going to cook more recipes like Eggplant Parmesan.


Baked Eggplant Parmesan

Baked Eggplant Parmesan
Prep time: 10 mins
Cook time: 40 mins
Total time: 50 mins
Serves: 4 to 6 servings
Ingredients
  • 1 teaspoon dried basil
  • 1 teaspoon garlic powder
  • ½ teaspoon salt
  • 1 egg
  • 1 tablespoon water
  • 1 large eggplant, sliced into ½ inch thick rounds
  • 2 cups tomato sauce of choice
  • 1 cup grated mozzarella cheese
  • ¼ cup fine grated Parmesan cheese
Instructions
  1. Preheat the oven to 425 degrees and line a 2 baking sheets with parchment paper.
  2. In a shallow bowl toss the bread crumbs with the basil, garlic and salt. In a separate bowl whisk together the egg and water until well blended.
  3. Place an eggplant round into the egg mixture, ensuring that both sides are evenly coated. Next place the egg coated round into the panko mixture and again coat it evenly. Place the round onto the lined baking sheet. Repeat this process until all the rounds are coated.
  4. Place the sheets in the oven for 10 minutes. Flip the rounds and place them back in the oven for another 10 minutes. When done the rounds should be golden and crisp. Remove from the oven and set aside.
  5. Using an 8×11 baking dish spread about 1 cup of tomato sauce evenly on the bottom of the pan. Place the baked rounds in an even layer on top of this. Spread another ½ cup of tomato sauce on top and sprinkle with roughly half of the mozzarella cheese. Place the remaining eggplant in another layer and repeat the process of adding sauce and cheese.
  6. When complete sprinkle the Parmesan on top and place in the oven for 18 to 20 minutes. The cheese should be melted and beginning to crisp. Remove from heat and serve immediately.
3.3.3077

April 20, 2016 October 23, 2018 Filed Under: Main Dish, Recipe, vegetarian Tagged With: Vegetarian

C&G April

By Jessica

This post may contain affiliate links. I may receive commissions for purchases made through links in this post.

IMAG0498

He is still dreaming of hunting seasons with months left to wait.

She screwed up her shoulder again and spent nearly 3 weeks laid up, and very frustrated about it.

Together they went pistol shopping and started the permit process.

She made a trip to Philly (more on that to come) while he started work on a deck (more on that to come also).

They are both looking forward to warmer weather and motorcycle rides in the very near future.


April 19, 2016 December 5, 2017 Filed Under: Wedding Tagged With: C&G

Meal Plan 4.17.16

By Jessica

This post may contain affiliate links. I may receive commissions for purchases made through links in this post.

This is a meal plan based on the the typical meals that I actually cook on a regular basis. It is not an exact diary of what we eat, but it’s pretty darn close. Enjoy!

Ground Turkey Fried Rice

Monday – Ground Turkey Fried Rice (Can use leftover rice from Friday)

Venison Meatballs

Tuesday – Venison Meatballs in Tomato Sauce over Spaghetti & Salad

Thai Ground Chicken Salad with Peanut Sauce Recipe

Wednesday – Thai Chicken Salad

Thursday – Hearty Miso Soup

Spanish Style Seafood Stew

Friday –Spanish Seafood Stew w/ Salad


April 17, 2016 April 8, 2016 Filed Under: Meal Plan

Mark Bittman’s Dandelion Greens with Double Garlic

By Jessica

This post may contain affiliate links. I may receive commissions for purchases made through links in this post.

Dandelion Greens

I’ve mentioned dandelion greens (in one of my first posts – sorry for the quality!) here in the past, but they don’t show up often because we don’t eat them often. they are incredibly bitter, and therefore not a house favorite. However I spotted them in a grocery store recently and decided to give them another shot, thinking that maybe farm grown would be less bitter. While I was very wrong in thinking that I don’t think we are going to stop trying them. There is a saying that Momma Chuck always says that goes something like “you have to try something 17 times before you know if you like it or not”. I like this because if forces us to move out of our comfort zone, keeps things interesting and adds to our health

The recipe I used this time is one that is adapted from Mark Bittman’s How to Cook Everything. I liked this recipe because it was easy and it helps mask some of the bitterness. I think next time I might serve them with a red sauce or something with something higher in acid to balance out the bitter taste.

Dandelion Greens with Double Garlic

I also tested out this recipe with a few other greens and found it lent itself well to kale, chard, and spinach, though perhaps best with spinach. I think it might be a nice method to cook broccoli rabe, which is one of my favorite vegetables. Really anything with oil and garlic is good. There is no going wrong there.

Dandelion Greens with Double Garlic
Ingredients
  • 1/4 cup extra virgin olive oil
  • 6 cloves of garlic, sliced
  • 1/4 teaspoon red pepper flakes
  • Salt and freshly ground black pepper, to taste
  • 1 pound dandelion greens with stems, washed and roughly chopped
  • 1/2 cup vegetable stock
  • 1 clove of garlic minced
Instructions
  1. Heat the olive oil in a large saucepan over medium-high heat. Add the sliced garlic, pepper flakes, and some salt and black pepper and cook for about 1 minute. The garlic should soften and become fragrant.
  2. Add the greens and stock. Cover and cook until the greens have wilted slightly, about 5 minutes.
  3. Remove the lid, but continue to cook and stir until the liquid has all but evaporated, about 5 more minutes. Add the minced garlic and cook for 1 more minute. Adjust seasonings and serve.
3.3.3077


April 13, 2016 October 23, 2018 Filed Under: Foraged, Recipe, Side Dish Tagged With: Foraged

4 Ways to Cook an Egg

By Jessica

This post may contain affiliate links. I may receive commissions for purchases made through links in this post.

4 Ways to Cook an Egg

So far in this cooking series I’ve gone over terms, gadgets, knifes & cuts, and while there are a lot more fundamentals to discuss I decided to jump ahead a bit and talk about some actual cooking. Your ready aren’t you? I think so.

There is a lot to be learned from cooking something as simple as cooking an egg and there are about a million ways to actually do it. In this post I’ll talk about a few standard methods.

First up is scrambled. Personally I think Scrambled eggs are the easiest way to cook an egg, though they may use up a few more dishes than some of the other options. However this is my proffered method when feeding a crowd.

IMG_9750

Step 1: Crack an egg into a small bowl. Using a fork proceed to “beat” the egg (essentially whisking it) until it is well blended and set aside.

Step 2:  Heat 1 tablespoon of butter in a non stick skillet over medium high heat.

Step 3: Gently pour the beaten egg into the center of the pan. All the egg to rest for a bout 30 seconds, you will see the egg begin to become opaque.

Step 4: With a spatula lift one side of the egg and fold it over. Continue to cook and fold the eggs until they have become completely opaque, thickened and mostly dry looking.

Step 5: Remove from heat and serve.

Next is Pan Fried. This is my favorite method because I really love a good runny yolk and crispy brown edges. There are a couple ways to pan fry and egg. Sunny side up is when the egg is only cooked from one side, resulting in a very uncooked yolk. Over easy is when the egg is flipped once but only cooked long enough to produce completely cooked whites and an runny yolk. Over hard is when the egg is flipped and cooked until there is no liquid left in the egg.

IMG_9735

Step 1: Heat 1 tablespoon of butter over medium high heat until melted and foamy.

Step 2: Crack the egg and gently open it over the pan so that the yolk stays in tact Then reduce the heat to medium low.

Step 3: Let the egg cook until the whites are opaque and firm. The yolk should begin to thicken, but not become opaque (this is sunny side up).

Step 4: Using a spatula carefully left the edges of the egg to be sure they are free from the pan. Slide the spatula under the egg and flip it over. Allow it to cook to desired doneness. For over easy the yolk should move when lightly prodded with the spatula, while over hard til be firm throughout.

Hard Boiled eggs are another pretty easy method to cook eggs, though you are then forced to take the time to peel the eggs, which is why it’s not my favorite. Similarly to pan fried there are many different ways to hard boil an egg. Soft boiled eggs are still runny on the inside (and super messy to eat).  The Kitchn has a great example of a soft boiled egg. Hard boiled eggs can also be boiled medium or hard, resulting in different yolk colors and textures.

(right: Hard Boiled egg Left: Medium boiled)


Step 1: Place eggs in a pot and cover with cold water by 1 inch.

Step 2: Place the pot on the stove and bring it to a boil over high heat. As soon as a rolling boil is reached cover and remove the pot from the heat.

Step 3: Let the pan rest (6 to 7 minutes for Medium, 8 to 10 for hard). Once desired doneness is reached drain the eggs and cool them in ice water.

Step 4: Remove the eggs from water, dry, peel and serve.

The final method of cooking that we are going to talk about today is poached egg. Poached eggs are some of my favorite to eat, but they can be a pain to cook, and many people struggle with cooking a perfect poached egg. The key to a perfect poached egg is pillow-y whites that are completely cooked and a runny yolk.

Poached Egg

Step 1: Fill a pot up to about 3/4 full and add about 1 tablespoon of vinegar. Bring it up to a boil and then reduce it to a brisk simmer.

Step 2: Crack an egg into a small bowl or measuring cup. Carefully sure the bowl to lower the egg into the water and then tip it out. The egg should kind of roll out of the cup into the water.

Step 3: Allow the egg to cook for roughly 4 minutes. Be sure the water is simmering for the entire cooking time.

Step 4: Very carefully remove the egg using a slotted spoon. Be sure it is well drained and serve.

Again these are just the 4 basic methods for cooking eggs, there are many more methods and variations, but this is enough to get you started. Now go practice!

The leftovers from this experiment

Here’s my recipe for Curried Egg Salad.

April 12, 2016 April 30, 2018 Filed Under: Cooking Lessons

  • « Go to Previous Page
  • Page 1
  • Interim pages omitted …
  • Page 57
  • Page 58
  • Page 59
  • Page 60
  • Page 61
  • Interim pages omitted …
  • Page 157
  • Go to Next Page »

Primary Sidebar

  • Facebook
  • Instagram
  • Pinterest
  • Twitter
  • YouTube
Hi, I'm Jessica. I'm an herbalist living in the great northeast with my husband Chuck, our two little boys, our dog Brody and a flock of chickens. I'm all about real, good food and good times with awesome people. I spend a lot of time outside, in my garden, and concocting potions and helping people feel their best. I also like tea, reading, and about a million other hobbies. I'm so happy your here on this adventure with me.

Footer

Copyright © 2025 · Foodie Pro Theme On Genesis Framework · WordPress · Log in