• Skip to primary navigation
  • Skip to main content
  • Skip to primary sidebar
  • Skip to footer

Sweet Love and Ginger

  • Home
  • About
  • Recipes
  • Garden
  • Work With Me

Hawaiian Rice Pilaf

Hawaiian Rice Pilaf

By Jessica

This post may contain affiliate links. I may receive commissions for purchases made through links in this post.

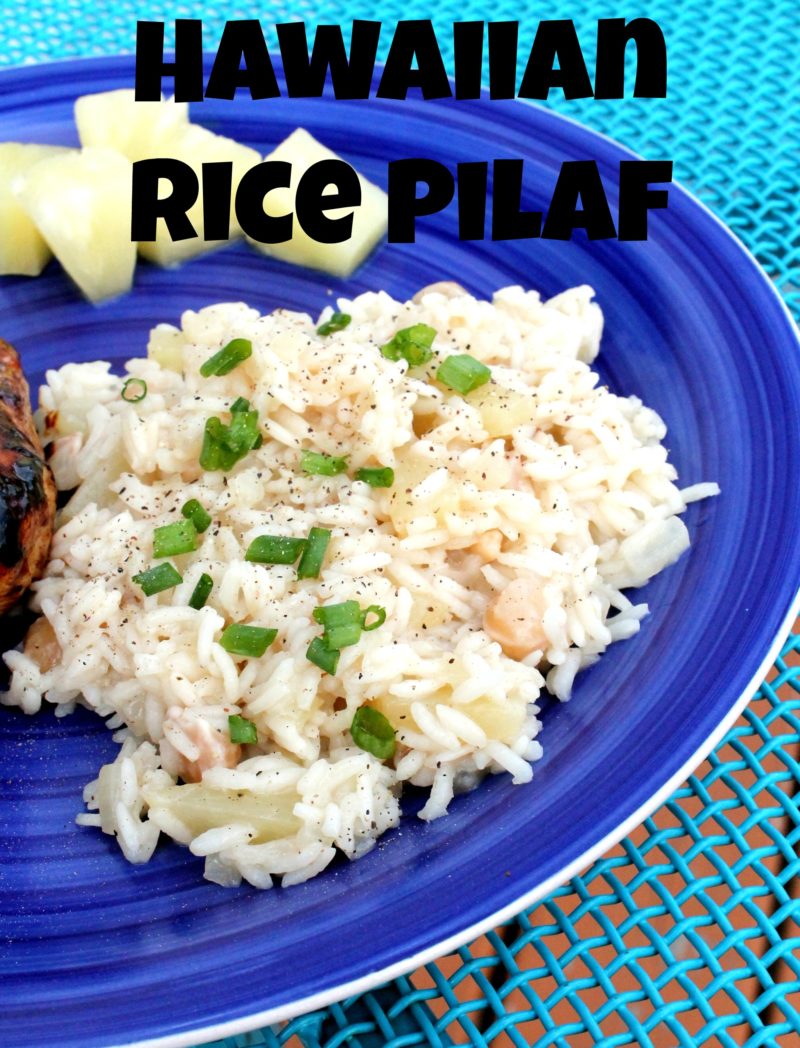
This is a recipe for basic Hawaiian Rice Pilaf. It is a fun twist on traditional pilaf that is sure to jazz up week night meals.

Hawaiian Rice Pilaf

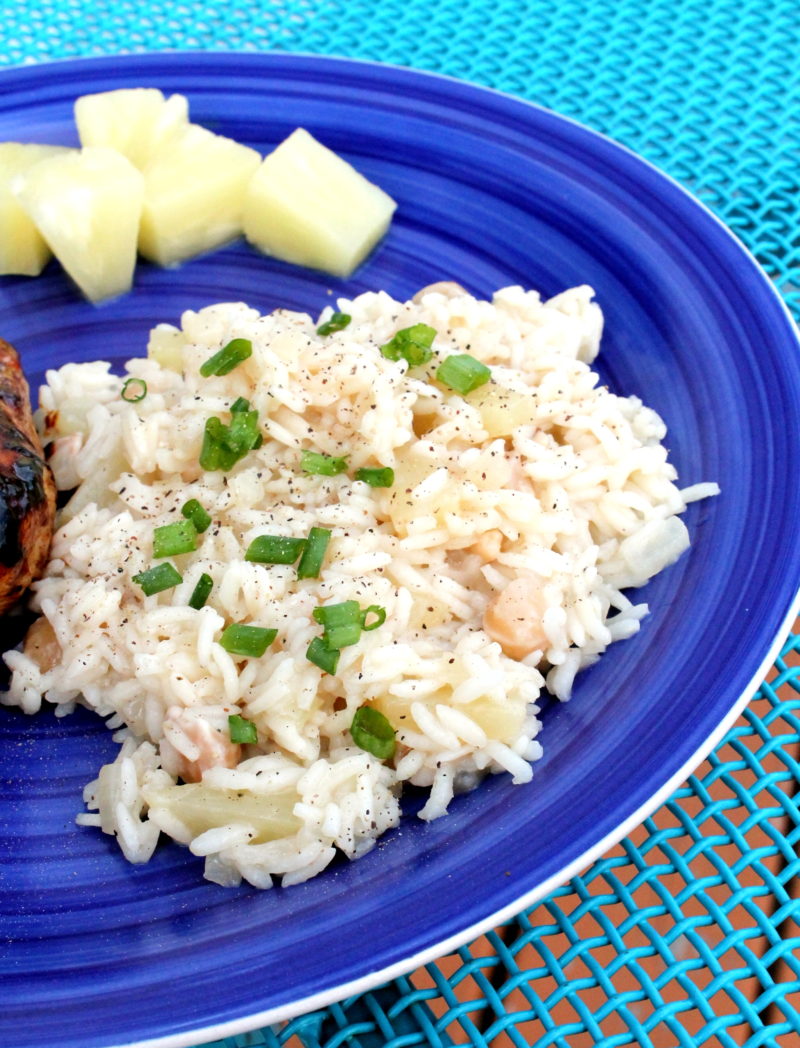
Almost a year ago now I have my first experience with this awesome take on a classic pilaf. It was the starch that Sister Chuck served at her wedding. I remember it being a burst of flavor, with a touch of creaminess, and lots of texture, essentially it was the perfect combination. With the summer drawing near around here I’ve been craving everything tropical. Yes my taste buds are on trend, no surprise there. Anyway I thought this would be the perfect dish to test out to satisfy my cravings.

It took a couple tries but I finally got that rich and tangy flavor I was looking for and it was perfectly satisfying. I really love how the macadamia nuts add just enough texture to the dish to really make it pop. I tried it with almonds and it just wasn’t right. Macadamia is where it’s at for this one.

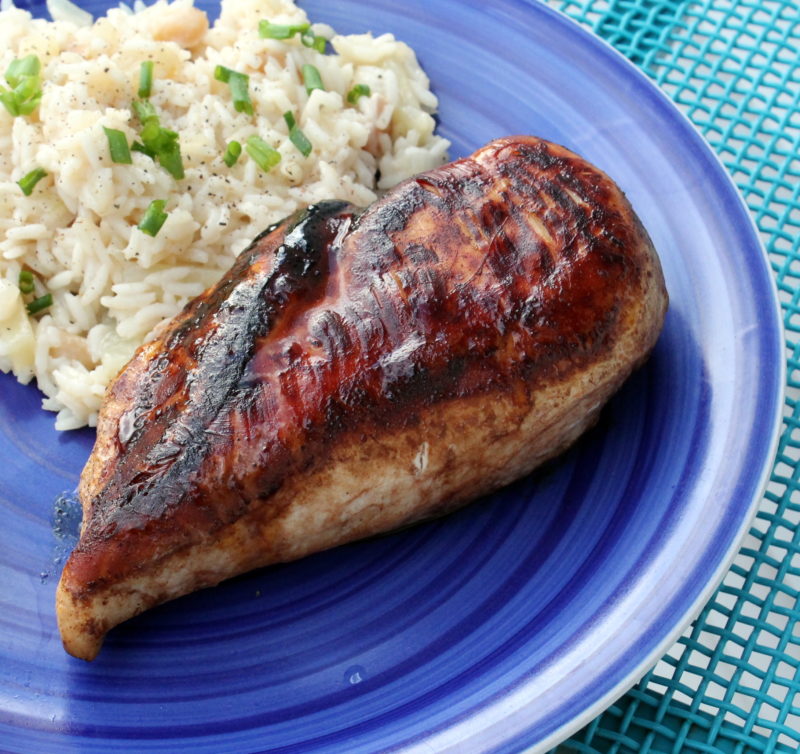
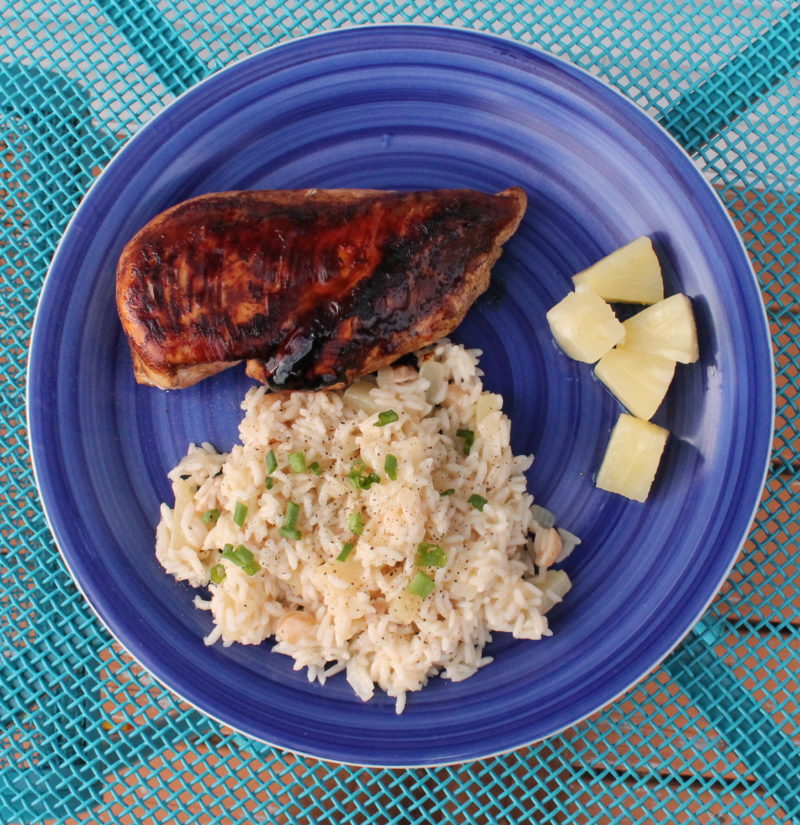
Also if you didn’t notice this was the also the main inspiration for last week’s Hawaiian Chicken Recipe. They go together like a charm, now add a tropical salad and you will be transported.

If you are interested in some other options to go with this one I also noticed some of my other favorite food blogger ladies are on this tropical kick too. Check out Christine’s Hawaiian Pineapple Chicken Kabobs, Chungah’s Asian Salmon Kabobs , or Tieghan’s Hawaiian Carne Asada.

It’s quite possible that you could make a giant batch of this pilaf and eat it with a different main dish nearly all week. I sincerely doubt that you could get bored with this much flavor going on.

Hawaiian Rice Pilaf

Hawaiian Rice Pilaf
Prep time: 5 mins
Cook time: 30 mins
Total time: 35 mins
Serves: 4 Servings
Ingredients
  • 2 tablespoons butter
  • ½ a medium onion, chopped
  • ½ cup chopped macadamia nuts
  • 1 cup diced pineapple
  • 1 ¼ cup white rice
  • 2 ½ cups chicken broth
  • 2 tablespoons chopped parsley
  • salt & pepper to taste
Instructions
  1. Melt butter in a thick bottomed sauce pan over medium high heat.
  2. Sauté onions, buts and pineapple for 1 to 2 minutes until the onions have softened.
  3. Add in the rice and cook for another 2 to 3 minutes until the rice begins to toast.
  4. Stir in chicken broth and bring it up to a boil. Reduce to a simmer cover and cook for 15 to 20 minutes, or until the rice is tender.
  5. Remove from heat and add parsley. Adjust the seasonings and serve.
3.3.3070

What are summer flavors are you craving right now? I’d love to know.

Have you come across any awesome tropical recipes? Please share them!! I’m working up quite the collection right now.

Hawaiian Rice Pilaf

May 19, 2015 November 1, 2015 Filed Under: Recipe Tagged With: Clean, Side Dish, Vegetarian, Weeknight Meals

Project No. 4 – Wood Photo Backdrop

By Jessica

This post may contain affiliate links. I may receive commissions for purchases made through links in this post.


photo back drop how to cover

I don’t think this project could be more fitting for my blog. I’ve been thinking for a while that I needed to move up in the world and start using more props and professional looking backgrounds in my photos. In the last year or two I really put in some effort to learn how to take better photographs. While I love art, I have never been good a getting quality photos, but I think I have learned a great deal and have really improved my skills quite a bit. The photo below is a perfect example of this.

Improve Food Photograhy

The recipe above is South West Meatballs Skillet.

I owe much of this improvement to the Tasty Food Photography ebook from Pinch of Yum. If food photography or photography in general is something you are interested in I definitely suggest you check this book out. It has so much useful information that applies to a wide range of photography, not just food (think jewelry, paper products and other inanimate objects).

Tasty Food Photography eBook

I got everything I needed at the local hardware store for about $3o. I used **pieces of #”x2’ craft wood and 2 pieces of 2.5”x2’ craft wood (1/4” thick wood), and wood glue to build the boards. Then I bought a stain sample and some white paint to give them some color.

IMG_7445

Here’s what I did

1) First I laid out half the wood to make a square that was roughly 2’ in length.

2) Then I used the remaining boards in the opposite direction to create another board.

3) I glued them all in place with the wood glue. A quarter sized drop of glue where each board touches should be enough.

4)Let it dry overnight with a couple crates of books on top of it. The weight helps press the wood together while it dries.

5) The next day I spray painted one side white, and let it dry. It was a super hot and sunny day so it was dry in less than 30 minutes.

6) After testing the white paint and determining that it was dry I stained the other side using the directions on the can.

Voila a homemade wood photo backdrop.

Photo back drop how to

Over all I couldn’t be more pleased with the results. This was a pretty easy project that I hope will be another step toward improved photography for me.

Now that I’m gearing up for project number 5 I am only getting more excited for this whole thing. I love pushing my limits and committing to doing one unique project a month. I am so happy I started this challenge.

Are you working on any projects that you are excited about? Do you have any unique projects that don’t use the materials I have already used? Please tell me about it all. I want to read all the crafty things!

May 18, 2015 May 13, 2015 Filed Under: 12-12-12, Crafts Tagged With: Projects

Wedding Traditions We Are Not Doing

By Jessica

This post may contain affiliate links. I may receive commissions for purchases made through links in this post.

Wedding tradition not doing

So it’s wedding season (obviously right?), well I’ve been seeing a few posts by others about all the wedding traditions that they aren’t doing. I thought that it would be fun to do the same.

  1. No save the dates – I already talked about this one in quite some depth.
  2. No receiving line – the ceremony and reception are at the same place, and there’s just no convenient way to do it so we aren’t. I never really liked them anyway.
  3. Non religious ceremony – This is probably the biggest non-traditional thing we are doing. While we were raised catholic for the most part (my religious history is a bit scattered) we have decided to have a friend become ordained in order to legally marry us. The ceremony will be off the cuff, non religious and very simple. It’s exactly what we want.
  4. Non-traditional guest book – I think this is becoming a thing, but I’m listing it anyway. I’ll be sure to share my guest book when I get around to actually doing it.
  5. No champagne toast – I don’t think this is necessary, it’s just and added cost. Especially since everyone will already have their cocktail of choice in hand. Half the stuff doesn’t even get drunk!
  6. I’m nixing “Here Comes the Bride” – I love Ave Maria so that will be played/sung instead.
  7. A desert table instead of a cake – I never really liked cake, plus we save on the cutting fees with a desert table. It helps that my aunt and step mom are pretty much pastry chef’s also. We are going to have a small cake to cut and save for our anniversary, but that’s it.
  8. I didn’t register for fine china, silver, towels, or linens – There’s probably 10 types of china sitting in my grandmas basement from old relatives, we prefer casual dining, I think storing extra stuff to use it once a year is silly, and a million other reasons not to get china and silver. Why towels and linens? We have been living together for nearly 4 years we have things we like, I don’t need doubles and triples of stuff just because.
  9. No fancy exit – That means no birdseed, rice, sparklers, bubbles etc., we are trying to reduce the awkward factor here by just sneaking out when we feel like it.
  10. No bouquet toss – And subsequently no garter toss. The whole thing always made me feel awkward. I mean it’s fine for some, but I want no one going up my skirt for any reason in front of my family thank you. As for the bouquet I just personally think its kind of overdone, and not everyone gets married these days and a million other reasons, so no just no.
  11. I ordered my dress offline and made the alterations myself – This is just my style, when all is said and done my dress and all its accessories will cost under $200. This is just my opinion, but spending excessive money on a dress that is worn once and then takes up closet space seems silly and frivolous. My dress was cheap, it won’t wrinkle or stain, I can move in it, and I feel beautiful in it. What more do you need?
  12. I’m not wearing shoes – I hate shoes. I usually sit at my work desk without them, and take the off as soon as I get anywhere. Most of the summer I don’t wear them and most weddings I hide them under the table to dance. Does anyone keep their shoes on during a wedding? I’ll have a pair of flip flops around for outside portions of the evening and pictures in the trees, but otherwise I might just wear a cute bohemian slipper. I’m working on making it now, so don’t worry I’ll post that one soon as well.
  13. I’m letting the girls pick their own dresses – this might be a “new tradition” but seriously I’m not into over thinking every stupid detail. I just want my girls there, happy and comfy.
  14. I chose mix matched table linens – If the girls aren’t going to match then there’s no reason everything else has to.

Phew! I didn’t realize how much of a hippy I am until I wrote this all out. I’m kind of shirking a lot of traditions here and I don’t even feel bad. This wedding is going to be everything that Chuck and I want. It is the laid back affair that is reminiscent of us, and our lifestyles. It’s definitely not everyone’s cup of tea that’s for sure, but it’s ours and I couldn’t be happier about it.

May 15, 2015 January 16, 2018 Filed Under: Wedding

Clean Hawaiian Marinated Chicken

By Jessica

This post may contain affiliate links. I may receive commissions for purchases made through links in this post.

This is a simple recipe for Hawaiian Marinated Chicken that is clean and healthy!
Hawaiian Marinated Chicken

We have fallen into a chicken breast rut. Yep, that’s seriously a thing. By that I mean I feel like I am always cooking the same chicken breast recipes over and over again.

It’s Spinach and Mozzarella Stuffed Chicken, Chicken Parmesan, Sherry Mushroom Chicken, or Asian Grilled Chicken, or some kind of chicken stir-fry, time after time after time. It gets old, so since its grilling season I am on a quest to try out some new chicken breast recipes.

Someday I hope to amass a collection that hits 100 recipes, and while that might take a while there’s no time like the present to get started on that goal.

To start off this is a new recipe I recently came up with to pair with a rice recipe that I wanted to try (that one is coming soon, don’t worry). I’m really happy with the way it came out, it was incredibly flavorful, and the chicken was super moist. It is also a completely clean recipe so it’s great for those of us trying to stay healthy.

Now if you have any amazing chicken recipes that I can try please send them my way! I’ll be sure to give all of my influencers credit in upcoming posts!

Hawaiian Chicken

Clean Hawaiian Marinated Chicken
Prep time: 5 mins
Cook time: 25 mins
Total time: 30 mins
Serves: 4 Servings
Ingredients
  • 1/3 cup unsweetened pineapple juice
  • 2 oz tomato paste
  • 1 tablespoon low sodium soy sauce
  • 1 teaspoon rice wine vinegar
  • 1 tablespoon honey
  • 1 lb boneless skinless chicken breasts
Instructions
  1. Whisk together the pineapple juice, tomato paste, soy sauce, vinegar, and honey.
  2. Place the chicken breasts in a bowl with a lid or a sealable bag and allow it to marinade for at least 30 minutes (may marinade for 24 hours in the fridge).
  3. To bake: Cook the chicken in a 350 degree oven for 20 to 25 minutes or until cooked through. Serve immediately.
  4. To grill: Place the chicken on a preheated grill (400 or more degrees) and cook for roughly 5 minutes a side. Then remove from heat and let rest for 5 to 10 minutes before serving.
3.3.3070


May 13, 2015 October 15, 2019 Filed Under: Chicken/Turkey, Main Dish, Recipe Tagged With: Chicken, Chicken/Turkey, Clean

Pre-made Breaded Chicken for the Freezer

By Jessica

This post may contain affiliate links. I may receive commissions for purchases made through links in this post.

This is a simple and healthy recipe for breaded chicken as well as instructions on how to freezer and re heat it for last minute weekly meals.

Sometimes I just don’t have the time to cook a wholesome dinner from scratch. Other times I simply don’t have the energy, and while take out pizza is always a great alternative we are trying desperately here to save our pennies (for that house!), and get a little healthier (for that wedding!).

 Lately I have been making a lot of extras to freeze, so that I can prepare healthy home cooked dinners in a flash. Things like soup, meatballs, cooked chicken and blanched veggies are easy to defrost and heat up. Today I wanted to share with you a pretty basic recipe for what we call Freezer Chicken. It’s lightly breaded chicken that is baked and then frozen to be used as needed at a later date.
My basic breaded chicken recipe is below. However the key to making this idea of frozen breaded chicken work is first freezing it on a sheet tray without allowing any of the pieces to touch and then putting it in a reseal-able storage container. Freezing the chicken separately helps prevent them from sticking together in the bag. This way it’s easy to pull out just one piece of chicken and heat it up in the oven or microwave before serving.
Italian Style Breaded Freezer Chicken
Author: JC
Ingredients
  • 1 cup whole wheat bread crumbs
  • ½ teaspoon salt
  • ½ teaspoon black pepper
  • ½ teaspoon garlic powder
  • 1 tablespoon Italian seasoning
  • 2 tbsp melted butter
  • 4 boneless skinless Chicken Breasts
Instructions
  1. Preheat the oven to 450 degrees.
  2. Combine bread crumbs and spices in a large shallow dish and set aside.
  3. On a cutting board place one hand on top of a single chicken breast. Carefully slice the meat horizontally midway up the chicken, cutting almost to the other side. Open it like a book and finish cutting it through. Place a piece of plastic wrap over the top of the chicken and working from the center out begin to pound the chicken with the smooth side of a mallet until it is about ¼ inch thick. Repeat this process with the remaining chicken.
  4. Brush the chicken with butter and dredge in the bread crumbs until well coated.
  5. Place on a greased baking sheet, and bake for 10 minutes. Turn the chicken and bake for another 10 minutes until cooked through.
  6. To Freeze: Remove from heat and let cool until room temperature. Freeze on a flat sheet tray without touching for about 30 minutes. Remove from tray and place into a large freezer bag and return to the freezer.
3.3.3070
Now that you have freezer chicken readily available to you here are some of my favorite ways to use it:
  • Dip them in Honey Mustard, or another favorite dip
  • Chicken Parmesan
  • Chicken Salad 
  • Chicken alfredo
  • BBQ or Buffalo chicken sandwich or wrap
  • Bacon Ranch Sandwich
  • Chicken Caesar Salad
  • Pizza toppings
  • Quick Chicken & Waffles

Got another suggestion? Lets hear it in the comments! I’ve got a ton of these so I’d love to try something new with them.

May 11, 2015 October 15, 2019 Filed Under: Chicken/Turkey, Recipe Tagged With: appetizer, Chicken, Clean

  • « Go to Previous Page
  • Page 1
  • Interim pages omitted …
  • Page 86
  • Page 87
  • Page 88
  • Page 89
  • Page 90
  • Interim pages omitted …
  • Page 157
  • Go to Next Page »

Primary Sidebar

  • Facebook
  • Instagram
  • Pinterest
  • Twitter
  • YouTube
Hi, I'm Jessica. I'm an herbalist living in the great northeast with my husband Chuck, our two little boys, our dog Brody and a flock of chickens. I'm all about real, good food and good times with awesome people. I spend a lot of time outside, in my garden, and concocting potions and helping people feel their best. I also like tea, reading, and about a million other hobbies. I'm so happy your here on this adventure with me.

Footer

Copyright © 2025 · Foodie Pro Theme On Genesis Framework · WordPress · Log in