• Skip to primary navigation
  • Skip to main content
  • Skip to primary sidebar
  • Skip to footer

Sweet Love and Ginger

  • Home
  • About
  • Recipes
  • Garden
  • Work With Me

vegetarian

Honey Chili Veggie Pizza with Lemon

By Jessica

This post may contain affiliate links. I may receive commissions for purchases made through links in this post.

This is a recipe for a vegan Honey Chili Veggie Pizza with Lemon that can easily be made vegan and makes for a great appetizer.

Honey Chili Veggie Pizza

Honey Chili Veggie Pizza

Before we dive into today’s recipe I want to take a moment to mention Food Blogger Pro, a website dedicated to helping food bloggers learn, grow, & monetize your blog. Membership enrollment will close on November 19th, and not be available again until spring 2016, with total membership being capped at 2,000 members! Don’t wait join now before you miss out.

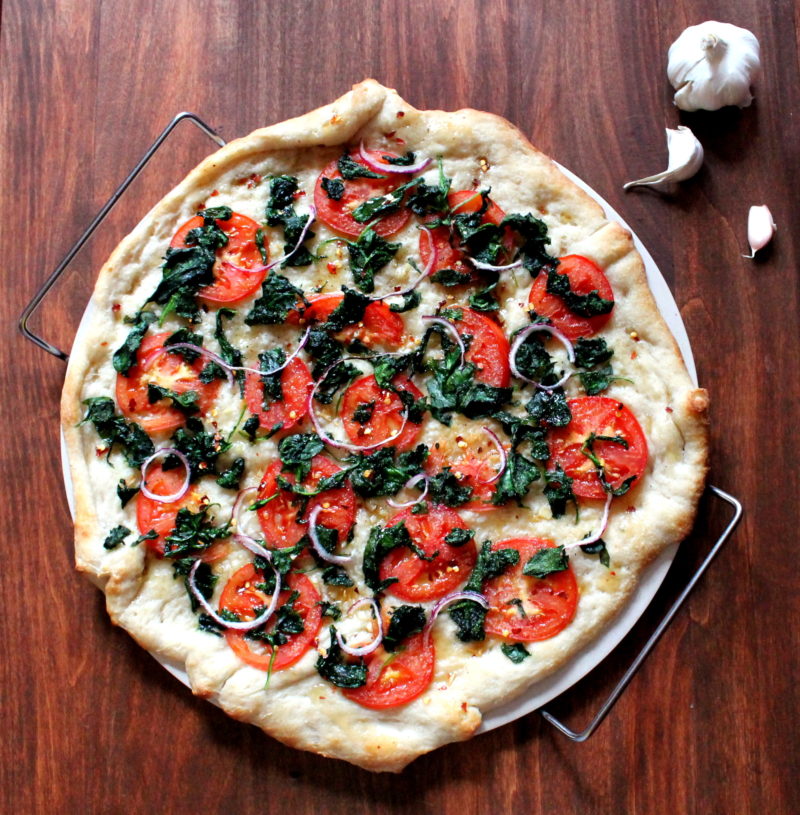
Now on to this cheese-less sauce-less pizza.

This is an interesting one. I came up with it on a whim as I was trying to come up with new and interesting appetizer’s that are dairy free. Why dairy free you ask? Because one of our close friends has an allergy. I always make it a point to bring something that she can have, because that’s what good friends do, plus it gives me an excuse to flex my creative cooking muscles. As it turned out this pizza is actually vegan and makes a great appetizer!

Honey Chili Veggie Pizza

This pizza came together quite easily and I was pleased with the results, as was the rest of the crowd. I actually got the idea from another Blue Apron Recipe. My favorite part of that recipe was the honey chili and I thought that the cheese kind of took away from that, because well cheese is delicious and tends to steal the show. So in remaking this recipe I decided to go cheese less and on that same note I went sauce less too, using sliced whole tomatoes instead. I think this made the whole thing a lot fresher.

All in all I think this is a great summer/early fall recipe, since it’s light and fresh and would go wonderfully with a nice chilled glass of sauvignon blanc. Now picture that on your back patio? Good scene right?

Honey Chili Veggie Pizza

For the pizza dough you can use a pre-made store bought version or make your own. I really like this recipe and use it for pretty much all my pizzas. To make it vegan swap out the honey for maple syrup or agave.

Honey Chili Veggie Pizza
Prep time: 10 mins
Cook time: 20 mins
Total time: 30 mins
Serves: Serves 6
Ingredients
  • 1 lb plain pizza dough recipe
  • 4 tablespoons extra virgin olive oil (plus more)
  • 3-4 gloves of garlic, minced
  • 8 ounces baby spinach, chopped
  • 1 tomato sliced thin
  • ¼ red onion, sliced thing
  • Zest from 1 lemon
  • Juice from 1 lemon
  • 2 tablespoons honey
  • ¼ teaspoon cracked red pepperflakes
  • ¼ teaspoon chili powder
Instructions
  1. Preheat the oven to 475 degrees.
  2. Lay the pizza out on a rimmed baking pan or pizza stone.
  3. In a large skillet heat oil and garlic over medium high heat for 1 to 2 minutes or until the garlic begins to brown and become fragrant. Remove from heat and use a brush to gently spread the garlic oil over the pizza dough until it is coated in a thin glossy layer.
  4. Add more oil to the pan if needed and return to heat. Stir in the spinach and cook for 2 to 3 minutes, until wilted. Remove from heat and set aside. Once cooled slightly use a strainer to press down the spinach and remove as much of the liquid as possible.
  5. Arrange the sliced tomato and onions on the pizza dough. Sprinkle with lemon zest. Spread the spinach over the top of the pizza.
  6. Place the pizza in the oven and cook for 18 minutes, or until the outer crust begins to brown.
  7. While the pizza cooks combine the honey, cracked red pepper and chili powder.
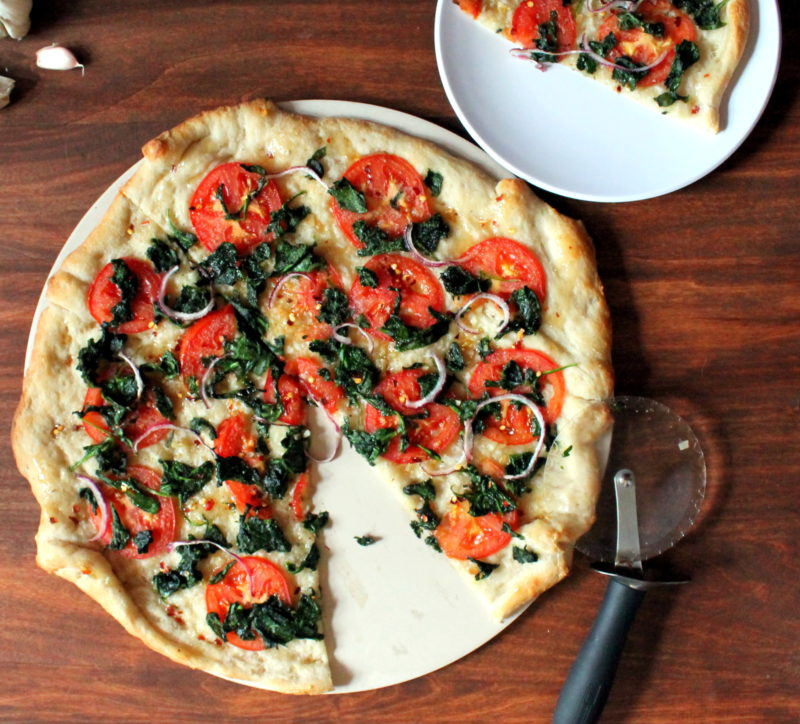
  8. Once browned remove the pizza from the oven and let stand for 2 to 3 minutes. Drizzle with honey chili combination and sprits with as much lemon juice as desired.
  9. Cut into slices and serve Immediately.
3.3.3077

What are some of your favorite pizza toppings?

November 11, 2015 October 23, 2018 Filed Under: Appetizer, Recipe, vegetarian Tagged With: appetizer, Vegan, Vegetarian

Light Vegetable Chowder

By Jessica

This post may contain affiliate links. I may receive commissions for purchases made through links in this post.

A light and healthy recipe for vegetable chowder that warms from the inside out while still being low in calories.

Light Vegetable Chowder

Chili, rainy days have come on strong in the north east.

This is the season when most people grumble and groan about cold weather, mud puddles, raking leaves and seasonal colds that float around. I, on the other hand revel in this season. The smell of fresh rain, the way my hair curls more than usual, there is plenty of reason to cuddle under blankets, drink hot tea and eat soup. Really I love this season.

I also really love soup, though Chuck isn’t quite as big a fan; he prefers something that he can sink his teeth into. I could eat soup all year round if allowed. Minestrone or Chicken and Dumplings are definitely my favorites. A Couple weekends ago while he was off hunting I made myself a big batch of vegetable chowder, enough to last me the weekend and then some. It was one of my better ideas since it was healthy, filling warm, and easy to reheat.

I pureed some cauliflower to thicken the soup and reduce the amount of cream and flour. Then I added all my favorite vegetables and spices. I made some homemade bread (recipe coming soon hopefully) to slurp up every last bit. It was the perfect dish for a chilly weekend.

Light Vegetable Chowder


Light Vegetable Chowder
Prep time: 20 mins
Cook time: 45 mins
Total time: 1 hour 5 mins
Serves: 6 Servings
Ingredients
  • 4 tablespoons unsalted butter, divided
  • 3 cloves of garlic
  • 1 onion, chopped
  • 6 cups low sodium vegetable broth, divided
  • 3 cups of cauliflower florets
  • 2 carrots, peeled and chopped
  • 2 stalks celery, chopped fine
  • 1 tablespoon flower
  • 4 cups vegetable broth
  • 1/3 cup milk
  • 1 bay leaf
  • 1 Sprig of thyme
  • 1 russet potato, peeled & chopped
  • 1 cup broccoli florets
Instructions
  1. Melt 2 tablespoons of butter in a large thick bottomed sauce pan over medium high heat. Stir in half of the onion and 2 cloves of garlic. Cook for one minute and stir in 2 cups of vegetable broth and 2 cups of cauliflower florets. Cover and cook for another 8 to 10 minutes or until the cauliflower is for tender. Transfer the contents of the pot to a blender and puree until smooth. Set aside.
  2. In the same pan add the rest of the butter and onion and saute for 1 to 2 minutes or until the onion is soft and fragrant. Stir in the garlic, carrots, and celery. Cook for 3 to 4 minutes stirring occasionally.
  3. Add the flour and cook, while whisking until browned, about 1 minute. Gradually whisk in the chicken broth, milk, bay leaf, thyme, potato, cauliflower, and broccoli. Cook for 2 minutes while stirring. Add the pureed cauliflower to the pan and bring to a boil. Reduce to a simmer and cook for another 5 to 10 minutes or until the potatoes are fork tender.
  4. Adjust seasonings and serve.
3.3.3077
Clean Corn Chowder

Clean Corn Chowder

Irish Vegetable Soup

Irish Vegetable Soup

Tuscan Bean Soup

Tuscan Bean Soup


November 4, 2015 October 23, 2018 Filed Under: Recipe, Soup/Stew, vegetarian Tagged With: Soup/Stew, Vegetarian

Summer Garden Vegetable Tomato Sauce

By Jessica

This post may contain affiliate links. I may receive commissions for purchases made through links in this post.

This is a recipe for Summer Garden Vegetable Tomato Sauce that I canned for later use using a pressure canner.

IMG_8064

The tomato bounty is winding down now. I’m so happy that despite my negligence my tomato plants produced enough for me to make a small batch of veggie tomato sauce. Something that’s kind of new in this house. In years past meat sauce has always been the thing, but I’m doing my best to change that, little by little.

I had a ton of vegetables sitting on my counter and in my fridge and they needed to get used up so I pretty much dumped them all in this sauce. I did find that the tomato flavor was dulled by all the vegetables, but it still tasted delicious so it’s a recipe I decided should be recorded.

Here is my Basic Tomato Sauce Recipe if you are interested.

Since adding vegetables to tomato sauce reduces the acidity a pressure canner is required to can it. I’m so happy to finally have one! I cannot wait until the temperatures go down a bit so I can comfortably make broth and can that. I sound like a total dork, but I really cannot wait!

If you are interested in canning your tomato sauce I used this method.

Summer Garden Vegetable Tomato Sauce
Prep time: 15 mins
Cook time: 2 hours
Total time: 2 hours 15 mins
Serves: 10 Servings
Ingredients
  • ½ cup olive oil
  • 1 small onion, chopped fine
  • 6 cloves of garlic, minced
  • 1 medium carrot, shredded fine
  • 1 cup eggplant, chopped fine
  • 1 cup zucchini, chopped fine
  • ½ cup green bell pepper, chopped fine
  • 10 cups tomatoes, seeded & chopped
  • 2 tsp black pepper
  • ½ tablespoon fresh chopped parsley
  • 1 ½ tablespoons fresh thyme
  • 1 tablespoon fresh basil, chopped
  • 1 tablespoon fresh oregano, chopped
  • Salt to taste
Instructions
  1. In a large thick bottomed sauce pan heat the oil over medium high heat. Add the onion, garlic, and carrots, cooking for one minute or until it becomes fragrant.
  2. Stir in the eggplant, zucchini, and green pepper and cook for another 2 to 3 minutes until the vegetables begin to soften.
  3. Add the tomatoes & spices and bring the mixture to a boil, stirring occasionally. Once boiling reduces the heat to low and allow it to simmer for 2 to 3 hours, with occasional stirring. Longer cooking times will result in a smoother – less chunky sauce.
  4. Adjust seasoning & serve.
  5. Note: To reduce cooking time use pureed tomatoes or puree the mixture after 30 minutes of simmering and serve.
3.3.3077


September 2, 2015 October 23, 2018 Filed Under: Odds & Ends, Pasta, Recipe, vegetarian

Mediterranean Chickpea Burgers

By Jessica

This post may contain affiliate links. I may receive commissions for purchases made through links in this post.

This is a great Copy Cat recipe for Morningstar Farms Mediterranean Chickpea Burgers that is full of flavor!

Mediterranean Chickpea Burgers

Remember way back when I did that whole Part Time Vegetarian thing? Well I’m still kind of doing it. I say kind of because I haven’t really kept track of what I eat in about 3 months, but while writing this post I decided to give my diet for the last little while a run down, and aside from a couple  weekends I’m still doing it with out even thinking about it. How awesome is that.

For those of you who don’t know Part Time Vegetarian, basically means that I only eat meat after 6 pm or with dinner. You can read more about why I started it in this post.

No when this whole thing started I was reliant on humus, bean burritos and MorningStar  products, but as time passes I have really expanded my horizons with hearty salads, tofu, and lots of veggie packed soups (I really love soup). I have also gotten a lot better about eating breakfast, and this Juice has become a staple snack in my life. I find myself craving vegetables like eggplant and zucchini, things that I was previously convinced that I didn’t like.

One of the things I started doing now that summer has hit is experiment with veggie burgers, which are incredibly satisfying and something I don’t know why I didn’t try more often before. I’m pretty sure that I perfected my own version of my all time favorite MorningStar Mediterranean Chickpea Burgers. These burgers from morning start are packed with flavor and great not only in burger form, but cut up in a wrap or on a salad. With this recipe I am able to make my own version in bulk for way cheaper, and then freeze them individually so that I can use them as needed. If you hadn’t noticed I’ve been into that lately.

The trick to keeping these from sticking together when frozen is to freeze them on a sheet tray first and then stack them with wax paper in between before sealing them up.

Mediterranean Chickpea Burgers

I know you are just going to love my copy cat recipe for these burgers. They are so flavorful, and have a dynamic texture that makes it hard to stop after just one!

Mediterranean Chickpea Burgers
Prep time: 20 mins
Cook time: 30 mins
Total time: 50 mins
Serves: 6 to 8 Servings
Ingredients
  • 2 (15 Ounce) cans chickpeas, drained and rinsed
  • 1 roma tomato, deseeded & chopped
  • 1 cup packed fresh baby spinach
  • 2 tablespoons rice flour + more if needed
  • ½ teaspoon garlic powder
  • 1 teaspoon onion powder
  • ¼ teaspoon salt
  • 1 ½ teaspoons lemon juice
  • ½ teaspoon paprika
  • ½ teaspoon cumin
  • ¼ teaspoon tumeric
Instructions
  1. Place chickpeas, tomato, spinach, salt and lemon juice in a blender and pulse until the mixture is chunky. You may need to stop and scrap the sides to get it all even, however do not allow it to get smooth.
  2. Transfer the mixture to a large bowl and with a fork gently fold in the rice flour, garlic, salt, lemon juice, paprika, cumin, and turmeric.
  3. With your hands form the mixture into patties. If it is too sticky fold in some more rice flour a teaspoon at a time. If it is too dry add a drop or two of water.
  4. Once 6 to 8 patties are formed place them on a flat surface to be placed in the refrigerator for 30 minutes or the freezer for 10 minutes. This will help them hold together while cooking.
  5. Preheat the oven to 375 degrees. Place the cold patties on a greased baking sheet and bake for 12-15 minutes per side.
  6. Serve immediately.
3.3.3070

Mediterranean Chickepea Burger

What are your favorite vegetarian burger recipes?


Related Posts:

Moroccan Chickpea Chili

Moroccan Chickpea Chili

Chicken Caesar Burger

Chicken Caesar Burger

Loaded Greek Salad

Loaded Greek Salad

May 20, 2015 July 10, 2018 Filed Under: Recipe, vegetarian Tagged With: Clean, Part Time Vegetarian, Sandwich, Vegan, Vegetarian

Kchidhi – Easy, Clean, Vegan, and Delicious

By Jessica

This post may contain affiliate links. I may receive commissions for purchases made through links in this post.

This is a easy and healthy recipe based on traditional Indian Kchidhi.

In my vegetarian adventures lately I have been stumbling across some really interesting new blogs that I will definitely be sharing with
you guys in the near future. This recipe is one that I adapted from one of these blogs, Holy Cow. It’s a super simple rice dish that I made for my lunch
at the beginning of the week. It was actually filling and satisfying enough to get me through the entire week without getting bored. That is something that never happens.

This recipe actually serves 4-6 people, but I’m sharing it here today because I think it’s a great vehicle for the single person to eat
all week. I just added whatever leftover veggies we had the night before, or steamed up some new ones and I had a complete meal that varied a little
throughout the week.
The version you see here is a simpler version, I guess you could say I “Americanized” it, but I wanted it to be an approachable recipe. The
original recipe isn’t difficult by any means, but I opted not to use a pressure cooker, and frozen veggies, to speed up the whole process.


Note: Garam Marsala was not available at my regular grocery store, however I did find it at whole foods.

 (Original Recipe)

Kchidhi – Easy, Clean, Vegan, and Delicious
Prep time: 5 mins
Cook time: 60 mins
Total time: 1 hour 5 mins
Serves: 4-6 Servings
Ingredients
  • 1 tsp vegetable oil
  • 1 large onion, chopped
  • ¼ tsp turmeric
  • ½ tsp cayenne
  • 1 tbsp coriander
  • 1 tsp garam masala
  • 1 tbsp dried ginger
  • 1 tbsp tomato paste
  • 1 ½ cups brown rice
  • 1 cup moong dal (lentils)
  • 1 cup frozen peas and carrots
  • Salt & pepper to taste
Instructions
  1. Place the moong dal in a bowl with 1 cup of water and let it sit for 15 minutes.
  2. Meanwhile heat oil in a large thick bottomed sauce pan, saute the onion for 5 minutes or so, until it is translucent and begins to carmelize.
  3. Add turmeric, cayenne, coriander, and ginger stirring for an additional minute.
  4. Stir in tomato paste for one minute then add rice moong dal (with liquid) and then 4 cups more water. Stir well and bring liquid to a boil. Reduce to a simmer, cover and cook for 35-40 minutes or until the rice and lentils are soft.
  5. Stir in the frozen vegetables and garam masala. Then remove from heat. There should be some liquid left in the bottom of the pan so that the consistency is similar to a risotto. Serve warm.
3.3.3070

July 18, 2014 May 11, 2015 Filed Under: Recipe, vegetarian Tagged With: Dinner 4 1, Make Ahead, Vegan, Vegetarian

  • « Go to Previous Page
  • Page 1
  • Interim pages omitted …
  • Page 6
  • Page 7
  • Page 8

Primary Sidebar

  • Facebook
  • Instagram
  • Pinterest
  • Twitter
  • YouTube
Hi, I'm Jessica. I'm an herbalist living in the great northeast with my husband Chuck, our two little boys, our dog Brody and a flock of chickens. I'm all about real, good food and good times with awesome people. I spend a lot of time outside, in my garden, and concocting potions and helping people feel their best. I also like tea, reading, and about a million other hobbies. I'm so happy your here on this adventure with me.

Footer

Copyright © 2025 · Foodie Pro Theme On Genesis Framework · WordPress · Log in