• Skip to primary navigation
  • Skip to main content
  • Skip to primary sidebar
  • Skip to footer

Sweet Love and Ginger

  • Home
  • About
  • Recipes
  • Garden
  • Work With Me

Clean

Clean Hawaiian Marinated Chicken

By Jessica

This post may contain affiliate links. I may receive commissions for purchases made through links in this post.

This is a simple recipe for Hawaiian Marinated Chicken that is clean and healthy!
Hawaiian Marinated Chicken

We have fallen into a chicken breast rut. Yep, that’s seriously a thing. By that I mean I feel like I am always cooking the same chicken breast recipes over and over again.

It’s Spinach and Mozzarella Stuffed Chicken, Chicken Parmesan, Sherry Mushroom Chicken, or Asian Grilled Chicken, or some kind of chicken stir-fry, time after time after time. It gets old, so since its grilling season I am on a quest to try out some new chicken breast recipes.

Someday I hope to amass a collection that hits 100 recipes, and while that might take a while there’s no time like the present to get started on that goal.

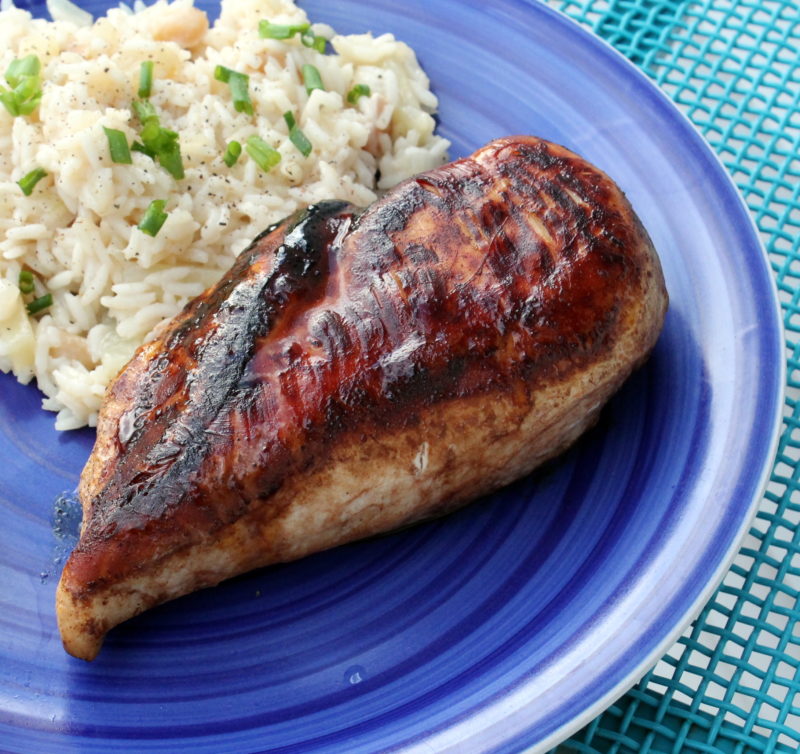
To start off this is a new recipe I recently came up with to pair with a rice recipe that I wanted to try (that one is coming soon, don’t worry). I’m really happy with the way it came out, it was incredibly flavorful, and the chicken was super moist. It is also a completely clean recipe so it’s great for those of us trying to stay healthy.

Now if you have any amazing chicken recipes that I can try please send them my way! I’ll be sure to give all of my influencers credit in upcoming posts!

Hawaiian Chicken

Clean Hawaiian Marinated Chicken
Prep time: 5 mins
Cook time: 25 mins
Total time: 30 mins
Serves: 4 Servings
Ingredients
  • 1/3 cup unsweetened pineapple juice
  • 2 oz tomato paste
  • 1 tablespoon low sodium soy sauce
  • 1 teaspoon rice wine vinegar
  • 1 tablespoon honey
  • 1 lb boneless skinless chicken breasts
Instructions
  1. Whisk together the pineapple juice, tomato paste, soy sauce, vinegar, and honey.
  2. Place the chicken breasts in a bowl with a lid or a sealable bag and allow it to marinade for at least 30 minutes (may marinade for 24 hours in the fridge).
  3. To bake: Cook the chicken in a 350 degree oven for 20 to 25 minutes or until cooked through. Serve immediately.
  4. To grill: Place the chicken on a preheated grill (400 or more degrees) and cook for roughly 5 minutes a side. Then remove from heat and let rest for 5 to 10 minutes before serving.
3.3.3070


May 13, 2015 October 15, 2019 Filed Under: Chicken/Turkey, Main Dish, Recipe Tagged With: Chicken, Chicken/Turkey, Clean

Pre-made Breaded Chicken for the Freezer

By Jessica

This post may contain affiliate links. I may receive commissions for purchases made through links in this post.

This is a simple and healthy recipe for breaded chicken as well as instructions on how to freezer and re heat it for last minute weekly meals.

Sometimes I just don’t have the time to cook a wholesome dinner from scratch. Other times I simply don’t have the energy, and while take out pizza is always a great alternative we are trying desperately here to save our pennies (for that house!), and get a little healthier (for that wedding!).

 Lately I have been making a lot of extras to freeze, so that I can prepare healthy home cooked dinners in a flash. Things like soup, meatballs, cooked chicken and blanched veggies are easy to defrost and heat up. Today I wanted to share with you a pretty basic recipe for what we call Freezer Chicken. It’s lightly breaded chicken that is baked and then frozen to be used as needed at a later date.
My basic breaded chicken recipe is below. However the key to making this idea of frozen breaded chicken work is first freezing it on a sheet tray without allowing any of the pieces to touch and then putting it in a reseal-able storage container. Freezing the chicken separately helps prevent them from sticking together in the bag. This way it’s easy to pull out just one piece of chicken and heat it up in the oven or microwave before serving.
Italian Style Breaded Freezer Chicken
Author: JC
Ingredients
  • 1 cup whole wheat bread crumbs
  • ½ teaspoon salt
  • ½ teaspoon black pepper
  • ½ teaspoon garlic powder
  • 1 tablespoon Italian seasoning
  • 2 tbsp melted butter
  • 4 boneless skinless Chicken Breasts
Instructions
  1. Preheat the oven to 450 degrees.
  2. Combine bread crumbs and spices in a large shallow dish and set aside.
  3. On a cutting board place one hand on top of a single chicken breast. Carefully slice the meat horizontally midway up the chicken, cutting almost to the other side. Open it like a book and finish cutting it through. Place a piece of plastic wrap over the top of the chicken and working from the center out begin to pound the chicken with the smooth side of a mallet until it is about ¼ inch thick. Repeat this process with the remaining chicken.
  4. Brush the chicken with butter and dredge in the bread crumbs until well coated.
  5. Place on a greased baking sheet, and bake for 10 minutes. Turn the chicken and bake for another 10 minutes until cooked through.
  6. To Freeze: Remove from heat and let cool until room temperature. Freeze on a flat sheet tray without touching for about 30 minutes. Remove from tray and place into a large freezer bag and return to the freezer.
3.3.3070
Now that you have freezer chicken readily available to you here are some of my favorite ways to use it:
  • Dip them in Honey Mustard, or another favorite dip
  • Chicken Parmesan
  • Chicken Salad 
  • Chicken alfredo
  • BBQ or Buffalo chicken sandwich or wrap
  • Bacon Ranch Sandwich
  • Chicken Caesar Salad
  • Pizza toppings
  • Quick Chicken & Waffles

Got another suggestion? Lets hear it in the comments! I’ve got a ton of these so I’d love to try something new with them.

May 11, 2015 October 15, 2019 Filed Under: Chicken/Turkey, Recipe Tagged With: appetizer, Chicken, Clean

Crispy Honey Mustard Sweet Potato Fries

By Jessica

This post may contain affiliate links. I may receive commissions for purchases made through links in this post.

Honey Mustard Sweet Potato Fries

I might be the smartest person to ever enter a kitchen.

Ok that might just be my opinion, but you should strongly consider the possibility that it’s true.

I came up with the craziest concept the other day and I had to try it. Then tweek it, and try it again, and again, and well hell 4th time is the charm. I may or may not have eaten all the experiments in between, you guys, because omg they were all delicious. Too bad I wasn’t just going for delicious though.

Honey Mustard Sweet Potato Fries

Not that delicious is bad (it’s totally great), you see, I wanted sweet potato fries and honey mustard, because they just go together you know? I mean that combination is already delicious so I wanted to do something different than just make a dipping sauce, because lets be real here that’s been done for year now. Not that there’s anything super wrong with dipping, dipping sauce is awesome, but not what I was looking for either.

I wanted an all in one fry, kind of like barbecue chips, they need nothing, all the flavor is there already.

Honey Mustard Sweet Potato Fries

So I toiled and toiled in a hot steamy kitchen; ok maybe I just baked a few batches of fries while I waited for Chuck to get back from golfing and it was actually a lot of fun. Let’s just go ahead and establish my dork status now, I like to experiment and you know use the scientific method, that thing we all learned in middle school. Yeah I’m that girl. Anyway coming up with the right spice to liquid ratio was the key here. We want crispy fries, with all the flavor and then there was the honey. I’m pretty positive there’s no way to cook the fries with the honey on them and have them come out both crispy and not burned honey tasting.

In the end the honey drizzle was just the thing. I’m pretty sure I ate my weight in sweet potato that day. It’s cool, I don’t have a wedding dress to squeeze myself into in a few months or anything. Psh. Whatever.

You are going to love this really, it’s the best, and the new way to cook sweet potato fries. I’m telling you this is going to be a thing.

Crispy Honey Mustard Sweet Potato Fries
Prep time: 10 mins
Cook time: 30 mins
Total time: 40 mins
Serves: 4 servings
Ingredients
  • 2 tablespoons oil
  • 1 tablespoon white wine vinegar
  • 1 teaspoon lemon juice
  • 1 tablespoon ground mustard
  • ½ teaspoon turmeric
  • ½ teaspoon salt
  • ¼ teaspoon pepper
  • ¼ teaspoon paprika
  • 2 large sweet potatoes, peeled and cut into strips
  • 1-2 tablespoons honey
  • 1 teaspoon of course sea salt
  • 1 tablespoon green onion, chopped (for garnish)
Instructions
  1. Preheat the oven to 400 degrees.
  2. In a small bowl whisk together the oil, vinegar, lemon, mustard, turmeric, salt, pepper, and paprika.
  3. In a large bowl toss the sweet potato with the spice mixture until well coated.
  4. Spread the potato out on a large prepared baking sheet, so that none of them are touching and place in the oven and bake for 15 minutes.
  5. Turn the fries once and place back in the oven for 15 minutes then remove from heat and let cool slightly.
  6. Drizzle with honey. Sprinkle with salt and green onion. Serve immediately.
3.3.3070

Honey Mustard Sweet Potato Fries

May 6, 2015 October 15, 2019 Filed Under: Recipe, Side Dish Tagged With: Clean, Gluten Free, Side Dish, Vegetarian

Thai Ground Chicken Salad with Peanut Sauce

By Jessica

This post may contain affiliate links. I may receive commissions for purchases made through links in this post.

Thai Ground Chicken Salad with Peanut Sauce
Everyone seems to be into these Thai lettuce wraps and what not, but lettuce wraps have never been my thing. I mean there’s only so much you can pack into a lettuce wrap before your lettuce is exploding all over the place.
Now I am a fan of messy food, usually the messier the better, but the ratio of the mess to food that actually makes it o my mouth needs to lean a certain way if you know what I mean. Why not just take all that goodness and plop it in a bowl, and eat it with a fork. It’s still messy but I get so much more into my mouth this way!
Thai Ground Chicken Salad with Peanut Sauce Recipe

It’s this line of thinking that got me to come up with this amazing recipe. It’s not just a Thai ground chicken salad, but it’s a Thai ground chicken salad on top of a loaded green salad and soaked in delicious peanut sauce.

Larb Gai

By the way, did you know that thai ground (or minced) chicken salad is a thing? Before researching this recipe (yep I’m  nerd) I had no idea, but it’s a traditional dish that’s usually served with sticky rice and it’s called Larb Gai. There that’s your piece of trivia for the day.

Back to the salad.
Seriously I could eat/talk about this thing all week.
I won’t torture you that way I’ll just give you the recipe.
A little note: make more peanut sauce than you think you will need. I promise it will end up on all kinds of things that you don’t expect, and you will run out before you are ready.
Thai Ground Chicken Salad with Peanut Sauce


Thai Ground Chicken Salad with Peanut Sauce
Prep time: 10 mins
Cook time: 10 mins
Total time: 20 mins
Serves: 4 Servings
Ingredients
  • 1 lb ground chicken
  • 1 teaspoon coconut oil
  • 1 small shallot, peeled and minced
  • 1/3 cup mint, chopped
  • 1/3 cup cilantro, chopped
  • 1 tablespoon lime juice
  • 1 ½ tablespoons fish sauce
  • 1 tablespoon rice flour
  • ½ teaspoon chili flakes
  • 2 teaspoons garlic powder
  • 1 teaspoon ground ginger
  • 3 tablespoons soy sauce
  • 2 tablespoon rice wine vinegar
  • 1 tablespoon fresh lime juice
  • 1 tablespoon oil
  • ½ cup peanut butter
  • ¼ cup water
  • 1 cup shredded lettuce of choice
  • 1 cup shredded cabbage
  • 1 large carrot, julienned
  • 4 red, yellow or orange sweet peppers, julienned
  • ½ cup green onions, chopped
  • 1 cup frozen edamame, defrosted
  • ½ cup crispy wonton strips
Instructions
  1. Heat a oil in a large skillet over medium-high heat.
  2. Add the ground chicken and cook, crumbling it as you go until the chicken is cooked through, about 3-5 minutes.
  3. Add the shallots and cook for another minute. Remove from heat and add the lime juice, fish sauce, rice flour, and chili flakes tossing to combine. Set aside.
  4. In a medium sized mixing bowl whisk together the garlic powder, ginger, soy sauce, vinegar, lime juice, oil, peanut butter, and water. Adjust the seasonings and set aside.
  5. In a large bowl toss the lettuce, cabbage, carrot, peppers, onions, and edamame.
  6. Top with the cooled chicken mixture. Drizzle with peanut sauce and top with crispy wonton strips.
  7. Serve immediately.
3.3.3077

April 22, 2015 October 15, 2019 Filed Under: Chicken/Turkey, Main Dish, Recipe, Salad Tagged With: Chicken, Clean, Condiment, salad

Chicken Teriyaki Meatball Skillet

By Jessica

This post may contain affiliate links. I may receive commissions for purchases made through links in this post.

Chicken Teriyaki Meatball Skillet
If you have been around here for a while you may notice a recipe that keeps popping up when I talk about eating clean eating, it’s my Southwest Meatball Skillet. I originally got the recipe from Clean Eating Magazine, and over the years have developed it to a tried and true recipe that we love and eat often.

…

Read More

March 25, 2015 October 29, 2018 Filed Under: Chicken/Turkey, Main Dish, Recipe Tagged With: Chicken, Chicken/Turkey, Clean, Quick & Easy, Weeknight Meals

  • « Go to Previous Page
  • Page 1
  • Interim pages omitted …
  • Page 5
  • Page 6
  • Page 7
  • Page 8
  • Page 9
  • Interim pages omitted …
  • Page 20
  • Go to Next Page »

Primary Sidebar

  • Facebook
  • Instagram
  • Pinterest
  • Twitter
  • YouTube
Hi, I'm Jessica. I'm an herbalist living in the great northeast with my husband Chuck, our two little boys, our dog Brody and a flock of chickens. I'm all about real, good food and good times with awesome people. I spend a lot of time outside, in my garden, and concocting potions and helping people feel their best. I also like tea, reading, and about a million other hobbies. I'm so happy your here on this adventure with me.

Footer

Copyright © 2025 · Foodie Pro Theme On Genesis Framework · WordPress · Log in