• Skip to primary navigation
  • Skip to main content
  • Skip to primary sidebar
  • Skip to footer

Sweet Love and Ginger

  • Home
  • About
  • Recipes
  • Garden
  • Work With Me

Jessica

Things you Probably Didn’t Know About me

By Jessica

This post may contain affiliate links. I may receive commissions for purchases made through links in this post.

I love these kinds of posts, so let’s just get right to it.

  1. I’m on my right now to an epic motorcycle and camping weekend in New Hampshire and I’m stoked for it.
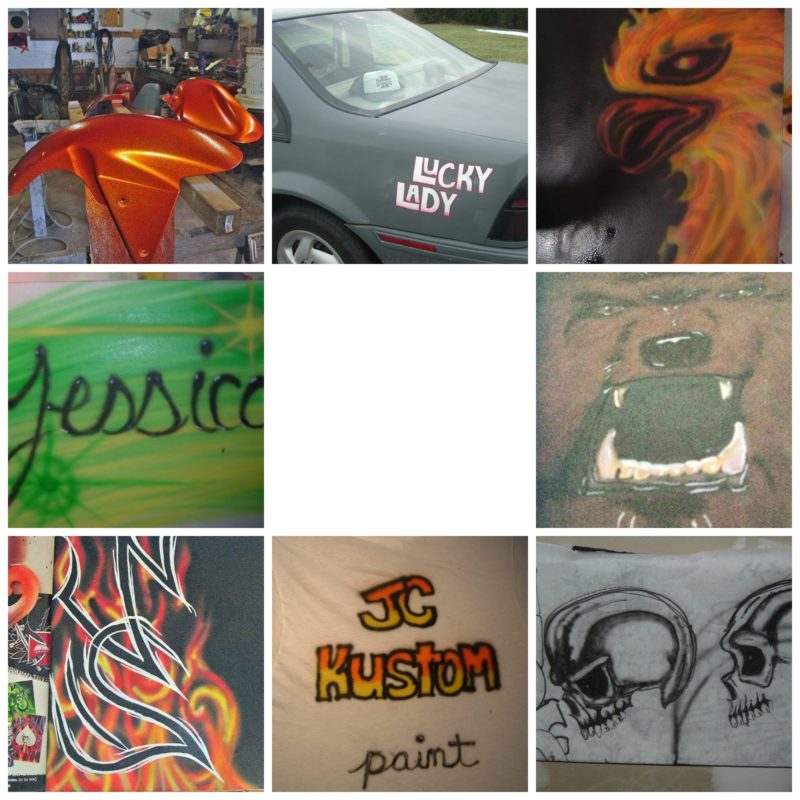
  2. I used to airbrush cars and motorcycles as a teenager. I should have never stopped.download (2)
  3. I really don’t like my name. I never thought it was fitting, and growing up there was always another Jessica in my class. If I could I’d change my name to my middle name.
  4. I’m good with blood and ghastly injuries, but I hide and make Chuck take care of it when the dog throws up. I can’t explain the rationale. There is none.
  5. I hate driving. I mean I have no issues with it, I can do it in the city and on the highway, heck that’s my daily commute, but I always try to talk someone else into driving when I can.
  6. I can’t cook plain white rice. I either forget to set a timer, or leave it on too high a heat. I know it’s ridiculous.
  7. I love a good wheat beer, especially with some good German food.
  8. I cry at every wedding I attend as well as every other time I read the news in the am. I’m pathetic, it’s cool.
  9. I’m currently addicted to Cookie Jam on my new phone.
  10. I also have a problem with Doritos. When they are at hand I have no self control.

There now you know a few more things about me. If your dying for more info like I know you are, check out my list of 32 things that make me happy, how I spend my me time, learn about my quirks, or find out what kinda girl I am.

Also head over to Helene’s page to find out more stuff you don’t know about your favorite bloggers.

June 18, 2015 January 16, 2018 Filed Under: In My Head

D4One: Shrimp and Sundried Tomato Cream Sauce Pasta

By Jessica

This post may contain affiliate links. I may receive commissions for purchases made through links in this post.

This is a pasta dish served with shrimp over a rich and sweet Sundried Tomato Cream Sauce. It is to die for!

Shrimp & Sun Dried Tomato Cream Sauce Pasta

I’ve admitted before that I am pretty much in love with this recipe that I first saw on Closet Cooking, I even made my own version with Chicken Basil Meatballs. Well I’m still pretty obsessed with it, though I’m trying to keep the amount of pasta, and cream sauces down to a minimum around here. I have a dress to fit into in just a few short months!!!

One particular evening while Chuck was out of town for work I gave into the craving and made the recipe I have for you today. If you recall one of my very first Dinner for One recipes was pretty similar to this dish, except the main flavor component in that one was my other love – pesto. Here is the original recipe.

Shrimp & Sun Dried Tomato Cream Sauce Pasta

I can’t believe I am actually posting that link, with the old theme colors and the horrible photos. I’ve learned a lot since then about recipe writing and photography. I mean check out this updated version of the recipe. Hello beautiful! It still amazes me how far I have come. A big shout out to Pinch of Yum’s Tasty Food Photography for so much good info!

But I should really get back to this amazing recipe.

It has all the hallmarks of a perfectly decadent meal for one; delicious fresh seafood, over aldente pasta and a rich, creamy, and slightly sweet sauce. A sauce so good that you could probably just eat that for the meal sans pasta or anything else, but for a balanced meals sake we will let the pasta and shrimp be its vehicle.

If you haven’t tried this sauce yet, I am demanding that you drop everything and just do it. You will not be disappointed I promise you.

Shrimp & Sun Dried Tomato Cream Sauce Pasta

D4One: Shrimp and Sundried Tomato Cream Sauce Pasta
Prep time: 5 mins
Cook time: 20 mins
Total time: 25 mins
Serves: 1 Serving
Ingredients
  • 2 ounces dry pasta
  • 1 tablespoon oil (olive or the oil from the sundried tomatoes works)
  • 4 ounces medium shrimp, peeled and deveined
  • 1 clove of garlic, minced
  • 1 tablespoon oil packed sundried tomatoes, chopped
  • ¼ cup chicken broth
  • 2 tablespoons whipping cream
  • 1 tablespoon grated parmesan cheese (plus more for garnish)
  • Salt and pepper to taste
  • ½ tablespoon fresh chopped basil for garnish
Instructions
  1. Cook the pasta according to package instructions until aldente.
  2. Meanwhile heat the oil over medium high heat in a large skillet. Add the shrimp and cook for 2 minutes a side or until the shrimp is pink and firm. Remove from the skillet and set aside.
  3. In the same pan add garlic and sundried tomatoes and cook for one minute.
  4. Add the broth to deglaze the pan, scraping the browned bits off the bottom.
  5. Stir in the cream, bring it up to a low simmer and reduce the heat to low. Stir in the parmesan cheese and cook for 2 to 3 minutes until thickened.
  6. Remove the pan from heat and stir in the shrimp and cooked pasta until everything is will coated.
  7. Adjust the seasonings and top with grated parmesan and basil to serve.
3.3.3077


June 16, 2015 October 8, 2015 Filed Under: Recipe Tagged With: Dinner 4 1, Pasta, Seafood

Wood Burnt Popsicle Stick Bracelets

By Jessica

This post may contain affiliate links. I may receive commissions for purchases made through links in this post.

This post is a how to on turning popsicle sticks into bracelets using wood burning techniques. 

  IMG_7745.2

Project No. 5. This project get’s an eh-ok rating. It was a fun afternoon, but I’m someone who likes rapid results so waiting for popsicles to soak and then dry was apparently too much for me. I kind of got bored half way through.

I got a soldering set for Christmas, or my birthday (I can’t remember?) and have been dying for a project to use it for. It’s this set for reference. I really want to make some cool jewelry but there’s really no good set up at our apartment for hot metal work, so I’m holding out for our future house set up (fingers crossed we can get in soon!). In the mean time I thought this would be a good way to get comfortable with the tools.

IMG_7733

My guess was right, I learned a lot, how to hold the iron, how fast it heats up, what the difference is heat does to wood, how smooth it draws, or doesn’t. I did enjoy the wood burning part, thought it’s nothing like drawing. First off you can’t hold it like a pencil, and you have to move slowly and evenly and not push too hard. Typing that makes me realize that this might be a good exercise in control for me, because clearly I have a problem with it. I don’t think I have the patience to really get into wood burning, but it’s nice to know that I can do it.

Here is what I did:

  1. Draw designs on popsicle sticks
  2. Wood burn over the drawings
  3. Soak the sticks in water for about 2 days (they didn’t seem pliable enough after 24 hours)
  4. Carefully hand bend the sticks and place them in a cup to dry
  5. After the sticks are fully dry remove them from the cups

As far as soaking the wood and bending it; I learned a lot there too. I attempted to do the burning on the flat popsicle stick and then bend it, only to find out that many of the places I had burnt become breaking points for the wood. Next time I would bend them ahead of time and burn after, though it might make the burning part more difficult.

IMG_7742

I also realized that my tiny wrists are not suited for this project because the bracelets just slip right off my wrist. I thought of doing this to them to help them stay, but honestly I’m just not that into the bracelets to keep working with them. A few of the sticks that would not bend at all I could potentially use as book marks, since I always seem to lose those.

So even if this project isn’t something I would do again that doesn’t mean that you won’t absolutely love it or come up with a better way than I did. I also learned a thing or two so it was well worth the time.

June 15, 2015 June 14, 2015 Filed Under: 12-12-12, Crafts

My Favorite Podcasts Right Now

By Jessica

This post may contain affiliate links. I may receive commissions for purchases made through links in this post.

download (2)

Podcasts seems to be my thing lately, I listen in the car, during data entry at work (because seriously how else could I actually get it done?), while cooking etc. Our house has always been filled with music, so this has been a bid weird for guitar loving Chuck, but for me it has really helped to focus on getting things done. Weird right?

Anyway I thought you might be interested in some of the many podcasts that I have tested out and am currently obsessed with. There are a few more that I listen to now and then but these are my first choices.

Elise gets crafty – This is the first podcast I ever listened to and it is the cause for all of the following obsessions. #thanksElise

Radio Lab – All the weird off topic and inexplicable things explained in this amazing podcast. If you have any interest in history or science you will get addicted to this one.

Make it Happen – This is a pretty new podcast. There are only a few episodes, but I can already tell it’s going to be a good one. I listened to episode number 2 multiple times and still feel like there’s so much more I can soak up from it.

Smart Passive Income – I don’t need to explain this one. It’s everywhere.

Creative Start – It’s just so inspiring. I love listening to creative people tell their stories.

The Lively Show – Jess get’s the in depth inside scoop on how successful ladies made it, and what it took to get them there. All those nitty-gritty details are just awesome.

Being Boss – I have followed Kathleen for a while so I jumped on board when she and Emily started this podcast, and I totally love it. I especially like the way they answer so many listener questions.

June 12, 2015 April 24, 2018 Filed Under: In My Head, Round Up

Foil Grilled Fajitas

By Jessica

This post may contain affiliate links. I may receive commissions for purchases made through links in this post.

  This is a simple and healthy recipe for Foil Grilled Fajita’s that can be cooked on the grill or over the fire.

Foil Grilled Fajitas 2

Cooking in the summer is annoying.

I will be the first to admit that.

It’s hot outside and the last thing many of us want to do is stand in front of the stove. I employ grill cooking as often as possible to avoid turning the oven on in our house and it does a lot to save us from the heat as well as save us money.

This recipe is easily one of my favorite foil dinner recipes whether it’s over a camp fire or a grill, it comes out delicious and perfect every time. The prep time is minimal, cooking is easy and it’s healthy, so it’s an all around great recipe.

Since Chuck and I are moving soon I actually made up a couple of these recipes in ziplock bags in the freezer. Then we can spend our evenings un packing and settling into our new house without having to think too much about dinner. Just pull it out of the freezer wrap it in foil and stick it on the grill (just be sure to add a few minutes to the cook time to account for starting with frozen food). Because I know you guys are going to ask some of the other recipes that I made up ahead are Crockpot Apple Barbeque Chicken, Herby Burgers, and Sausage, Pepper and Potato Foil Packets.

Foil Fajitas

It’s also great for a crowd; served with a number of different toppings everyone can make their own with little extra work from you! My favorite toppings are beans, rice, fresh chopped tomatoes, cheese, cilantro and avocado, while Chucks favorites are salsa, lettuce, sour cream, and cheese.

Find my Clean Homemade Fajita Mix here. The recipe in this post is the exact amount needed to make the recipe below.

Foil Grilled Fajitas
Prep time: 5 mins
Cook time: 15 mins
Total time: 20 mins
Serves: 4 servings
Ingredients
  • 1 packet of fajita spice mix (or homemade)
  • 1 lb boneless, skinless chicken breast cut into strips
  • 1 red or yellow pepper, deseeded and sliced
  • 1 onion, sliced thin
  • 4 tortillas
Instructions
  1. Combine all ingredients in a large bowl, and toss until everything is well coated in seasoning.
  2. Lay two large pieces of foil out and split the mixture up between the pieces of foil.
  3. Take two opposite sides of the foil and crimp them together to create a tube around the mixture. Then crimp the openings on the side closed to create a packet.
  4. Place on a grill preheated to medium high and cook for 8 to 10 minutes, flip and cook for another 5 to 6 minutes, or until the chicken is cooked through.
  5. Remove from heat and carefully open packets allowing the steam to escape before serving over tortillas.
3.3.3077


I’m planning on posting a few more foil dinners soon so I’d love it if you guys could share your favorites in the comments for me to give a try!

Fajita Spice Mix

Hommade Fajita Spice Mix

Homemade Taco Seasoning

Homemade Taco Seasoning

Taco Pot Pie

Taco Pot Pie


Foil Grilled Fajitas

June 10, 2015 January 21, 2016 Filed Under: Recipe Tagged With: Camping/hiking, Chicken, Clean, Quick & Easy

  • « Go to Previous Page
  • Page 1
  • Interim pages omitted …
  • Page 93
  • Page 94
  • Page 95
  • Page 96
  • Page 97
  • Interim pages omitted …
  • Page 171
  • Go to Next Page »

Primary Sidebar

  • Facebook
  • Instagram
  • Pinterest
  • Twitter
  • YouTube
Hi, I'm Jessica. I'm an herbalist living in the great northeast with my husband Chuck, our two little boys, our dog Brody and a flock of chickens. I'm all about real, good food and good times with awesome people. I spend a lot of time outside, in my garden, and concocting potions and helping people feel their best. I also like tea, reading, and about a million other hobbies. I'm so happy your here on this adventure with me.

Footer

Copyright © 2026 · Foodie Pro Theme On Genesis Framework · WordPress · Log in