• Skip to primary navigation
  • Skip to main content
  • Skip to primary sidebar
  • Skip to footer

Sweet Love and Ginger

  • Home
  • About
  • Recipes
  • Garden
  • Work With Me

Recipe

Chopped Thai Chicken Salad

By Jessica

This post may contain affiliate links. I may receive commissions for purchases made through links in this post.

This is a simple recipe for a chopped chicken salad with Thai style dressing.

As you can probably assume things are a little crazy  around these parts since we just closed on our house last week, so getting together a recipe post for this week has been a bit difficult. I decided instead today to resurrect an old post that I wrote for The Charming Blog (which is now defunct) almost a year ago. This Thai Grilled Chicken Salad has been a big favorite of both me and Chuck, so I think you guys will enjoy it here too. 


Chopped Thai Chicken Salad

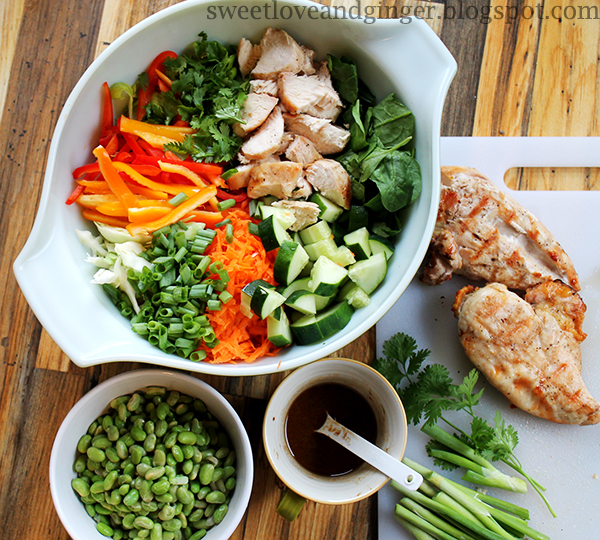
Salad is one of those things that people consider rabbit food, you know not real food. This however is one of those life changer type of salads that can turn a real meat and potatoes types into actual salad lovers.

It’s loaded down with veggies and chicken, and a super amazing deliciously sweet salad dressing.

There are a million textures going on and with each of the textures comes a super bright fresh flavor, and it is all brought together with that sweet zingy dressing.

I’m gushing, I know, but seriously, its salad. It’s a delicious wonderful, nourishing salad. It’s also hearty, and satisfying, and filling salad, that can feed the whole family without trouble.

I just grilled the chicken with salt and pepper, but don’t be afraid to use leftover or premade chicken. It will blend into the flavors just fine.
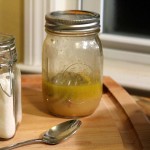
Chopped Thai Chicken Salad-2

Chopped Thai Chicken Salad
Prep time: 10 mins
Total time: 10 mins
Serves: 4 Servings
Ingredients
  • Dressing
  • 2 tbsp low sodium soy sauce
  • 1 tbsp sesame oil
  • 2 tbsp rice vinegar
  • 2 tbsp raw honey
  • 1 tbsp lime juice
  • 1 tbsp extra virgin olive oil
  • 2 cloves of garlic, crushed
  • Salad
  • 16 ounces frozen shelled edamame
  • 4 cups mixed greens, chopped
  • 2 cups chopped Napa cabbage
  • 1 cucumber, diced
  • 1 cup shredded carrot
  • ½ red bell pepper, sliced
  • ½ yellow bell pepper, sliced
  • 4 chopped green onions
  • ½ cup fresh cilantro
  • 1 lb cooked chicken, chopped or shredded
Instructions
  1. In a small bowl whisk together all the dressing ingredients and set aside. Cook the edamame according to package instructions and set aside to cool. Meanwhile chop the rest of your vegetables, and toss them together in a large bowl. Top with chicken and serve with the dressing at the side.
3.3.3077


June 30, 2015 February 6, 2018 Filed Under: Recipe Tagged With: Chicken, Clean, Quick & Easy, salad, Weeknight Meals

Cheesy Grilled Hasselback Potatoes

By Jessica

This post may contain affiliate links. I may receive commissions for purchases made through links in this post.

Liven up your typical backed potato with this recipe for Cheesy Grilled Hasselback Potatoes.

 IMG_5235

I’m really glad to see that my weekly meal plans are such a hit here on the blog. I love creating them and sharing with you guys the style of food that we actually eat every single day. I’ve noticed while trying to put these together that there is a serious lack of side dishes here on the blog so I’ve made it a point to get a few more of our favorite side dishes posted for you.

Hasselback potatoes are one of our favorite side dishes because they are fun! It’s a little different that a normal backed potato, which let’s be honest can get so boring! I’ve never really been a fan of plain baked potatoes. Hasselback potatoes can get crisp edges and soft insides which is something that baked potatoes lack, but they are still just as versatile.

In this recipe I kept it simple with cheddar cheese, but feel free to add any other toppings that you like on a typical baked potato. I know you can get creative here with things like sour cream, chives, bacon, pickles, or salsa. Really the sky is the limit with these babies.

IMG_5238

Note 1: I also want to note that while this recipe uses the grill you can also make them easily in the oven. Simply cook them at 400 degrees in the oven for about 55 minute to one hour.

Note 2: Peeling the potatoes is optional. I like them better peeled, but Chuck likes the crisp skin it doesn’t change the instructions either way.

Cheesy Grilled Hasselback Potatoes
Cook time: 1 hour
Total time: 1 hour
Serves: 4 Servings
Ingredients
  • 4 medium russet potatoes, washed
  • 4 tablespoons butter
  • Salt and pepper to taste
  • 1 teaspoon of garlic powder
  • 6 ounces cheddar cheese
  • ½ tablespoon chopped chives for garnish
Instructions
  1. Cut each potato into thin slices without cutting all the way through.
  2. Place the potatoes on a plate and microwave for 3 minutes, rotate and microwave again for 3 minutes. Place each potato on a piece of foil large enough to enclose the potato.
  3. Melt the butter and combine it with the garlic, salt and pepper. Use a brush to coat each potato evenly.
  4. Fold the sides of the foil up to create a pouch and place each potato on a preheated grill. Cook for 35 to 40 minutes or until the potato is tender.
  5. Carefully remove from the grill and open the foil packets. Sprinkle the top with cheese and place back on the grill for 4 to 5 minutes or until the cheese is melted.
  6. Garnish with chives and serve immediately.
3.3.3077

What are your favorite side dish recipes? I would really love to try some new ones!!

June 24, 2015 June 18, 2015 Filed Under: Recipe, Side Dish

D4One: Shrimp and Sundried Tomato Cream Sauce Pasta

By Jessica

This post may contain affiliate links. I may receive commissions for purchases made through links in this post.

This is a pasta dish served with shrimp over a rich and sweet Sundried Tomato Cream Sauce. It is to die for!

Shrimp & Sun Dried Tomato Cream Sauce Pasta

I’ve admitted before that I am pretty much in love with this recipe that I first saw on Closet Cooking, I even made my own version with Chicken Basil Meatballs. Well I’m still pretty obsessed with it, though I’m trying to keep the amount of pasta, and cream sauces down to a minimum around here. I have a dress to fit into in just a few short months!!!

One particular evening while Chuck was out of town for work I gave into the craving and made the recipe I have for you today. If you recall one of my very first Dinner for One recipes was pretty similar to this dish, except the main flavor component in that one was my other love – pesto. Here is the original recipe.

Shrimp & Sun Dried Tomato Cream Sauce Pasta

I can’t believe I am actually posting that link, with the old theme colors and the horrible photos. I’ve learned a lot since then about recipe writing and photography. I mean check out this updated version of the recipe. Hello beautiful! It still amazes me how far I have come. A big shout out to Pinch of Yum’s Tasty Food Photography for so much good info!

But I should really get back to this amazing recipe.

It has all the hallmarks of a perfectly decadent meal for one; delicious fresh seafood, over aldente pasta and a rich, creamy, and slightly sweet sauce. A sauce so good that you could probably just eat that for the meal sans pasta or anything else, but for a balanced meals sake we will let the pasta and shrimp be its vehicle.

If you haven’t tried this sauce yet, I am demanding that you drop everything and just do it. You will not be disappointed I promise you.

Shrimp & Sun Dried Tomato Cream Sauce Pasta

D4One: Shrimp and Sundried Tomato Cream Sauce Pasta
Prep time: 5 mins
Cook time: 20 mins
Total time: 25 mins
Serves: 1 Serving
Ingredients
  • 2 ounces dry pasta
  • 1 tablespoon oil (olive or the oil from the sundried tomatoes works)
  • 4 ounces medium shrimp, peeled and deveined
  • 1 clove of garlic, minced
  • 1 tablespoon oil packed sundried tomatoes, chopped
  • ¼ cup chicken broth
  • 2 tablespoons whipping cream
  • 1 tablespoon grated parmesan cheese (plus more for garnish)
  • Salt and pepper to taste
  • ½ tablespoon fresh chopped basil for garnish
Instructions
  1. Cook the pasta according to package instructions until aldente.
  2. Meanwhile heat the oil over medium high heat in a large skillet. Add the shrimp and cook for 2 minutes a side or until the shrimp is pink and firm. Remove from the skillet and set aside.
  3. In the same pan add garlic and sundried tomatoes and cook for one minute.
  4. Add the broth to deglaze the pan, scraping the browned bits off the bottom.
  5. Stir in the cream, bring it up to a low simmer and reduce the heat to low. Stir in the parmesan cheese and cook for 2 to 3 minutes until thickened.
  6. Remove the pan from heat and stir in the shrimp and cooked pasta until everything is will coated.
  7. Adjust the seasonings and top with grated parmesan and basil to serve.
3.3.3077


June 16, 2015 October 8, 2015 Filed Under: Recipe Tagged With: Dinner 4 1, Pasta, Seafood

Foil Grilled Fajitas

By Jessica

This post may contain affiliate links. I may receive commissions for purchases made through links in this post.

  This is a simple and healthy recipe for Foil Grilled Fajita’s that can be cooked on the grill or over the fire.

Foil Grilled Fajitas 2

Cooking in the summer is annoying.

I will be the first to admit that.

It’s hot outside and the last thing many of us want to do is stand in front of the stove. I employ grill cooking as often as possible to avoid turning the oven on in our house and it does a lot to save us from the heat as well as save us money.

This recipe is easily one of my favorite foil dinner recipes whether it’s over a camp fire or a grill, it comes out delicious and perfect every time. The prep time is minimal, cooking is easy and it’s healthy, so it’s an all around great recipe.

Since Chuck and I are moving soon I actually made up a couple of these recipes in ziplock bags in the freezer. Then we can spend our evenings un packing and settling into our new house without having to think too much about dinner. Just pull it out of the freezer wrap it in foil and stick it on the grill (just be sure to add a few minutes to the cook time to account for starting with frozen food). Because I know you guys are going to ask some of the other recipes that I made up ahead are Crockpot Apple Barbeque Chicken, Herby Burgers, and Sausage, Pepper and Potato Foil Packets.

Foil Fajitas

It’s also great for a crowd; served with a number of different toppings everyone can make their own with little extra work from you! My favorite toppings are beans, rice, fresh chopped tomatoes, cheese, cilantro and avocado, while Chucks favorites are salsa, lettuce, sour cream, and cheese.

Find my Clean Homemade Fajita Mix here. The recipe in this post is the exact amount needed to make the recipe below.

Foil Grilled Fajitas
Prep time: 5 mins
Cook time: 15 mins
Total time: 20 mins
Serves: 4 servings
Ingredients
  • 1 packet of fajita spice mix (or homemade)
  • 1 lb boneless, skinless chicken breast cut into strips
  • 1 red or yellow pepper, deseeded and sliced
  • 1 onion, sliced thin
  • 4 tortillas
Instructions
  1. Combine all ingredients in a large bowl, and toss until everything is well coated in seasoning.
  2. Lay two large pieces of foil out and split the mixture up between the pieces of foil.
  3. Take two opposite sides of the foil and crimp them together to create a tube around the mixture. Then crimp the openings on the side closed to create a packet.
  4. Place on a grill preheated to medium high and cook for 8 to 10 minutes, flip and cook for another 5 to 6 minutes, or until the chicken is cooked through.
  5. Remove from heat and carefully open packets allowing the steam to escape before serving over tortillas.
3.3.3077


I’m planning on posting a few more foil dinners soon so I’d love it if you guys could share your favorites in the comments for me to give a try!

Fajita Spice Mix

Hommade Fajita Spice Mix

Homemade Taco Seasoning

Homemade Taco Seasoning

Taco Pot Pie

Taco Pot Pie


Foil Grilled Fajitas

June 10, 2015 January 21, 2016 Filed Under: Recipe Tagged With: Camping/hiking, Chicken, Clean, Quick & Easy

Homemade Fajita Spice Mix

By Jessica

This post may contain affiliate links. I may receive commissions for purchases made through links in this post.

This is a recipe for a simple Homemade Fajita Spice Mix.

Fajita Spice Mix

Fajita’s like tacos are pretty much a staple in our house, we eat them all the time, especially in the summer because they are easy. Who wants to spend hours in front of a hot stove for dinner when it’s 100 degrees outside?

In an attempt to eat a bit healthier I make many of my own spice mixes instead of buying the packets available at the grocery store. At the very least it reduces the amount of sodium and sugar that we intake regularly.

I’ve already shared my favorite taco seasoning recipe so I thought it would be a good idea to share my fajita seasoning recipe as well. It’s pretty simple and comes from spices that I already have in my cupboard.

If you are looking for something that creates a thicker sauce add a tablespoon of corn starch to the mixture and a couple tablespoons of water while cooking. I prefer less sauce on my fajitas so I do not include these extra’s in my recipe.

The recipe below results enough seasoning for roughly 1 pound of meat, but it’s easy enough to double or triple for whatever size batch you are making. It’s also great as a rub for sliced steak or pork fajitas as well.

Homemade Fajita Spice Mix
Ingredients
  • 4 teaspoons of Chili Powder
  • 2 teaspoons of paprika
  • 1 teaspoon cumin
  • ½ teaspoon onion powder
  • ½ teaspoon garlic powder
  • ½ teaspoon cayenne powder (more if you like spice)
  • 1 teaspoon salt
  • ½ teaspoon sugar
Instructions
  1. Combine all ingredients in a bowl or jar.
  2. Can be stored in an airtight container for up to 3 months.
3.3.3070
Sweet Chili Sauce

Sweet Chili Sauce

Lemon Shallot Vinaigrette

Lemon Shallot Vinaigrette

Taco Seasoning

Taco Seasoning

June 9, 2015 January 8, 2016 Filed Under: Recipe Tagged With: Clean, Condiment, Quick & Easy

  • « Go to Previous Page
  • Page 1
  • Interim pages omitted …
  • Page 36
  • Page 37
  • Page 38
  • Page 39
  • Page 40
  • Interim pages omitted …
  • Page 84
  • Go to Next Page »

Primary Sidebar

  • Facebook
  • Instagram
  • Pinterest
  • Twitter
  • YouTube
Hi, I'm Jessica. I'm an herbalist living in the great northeast with my husband Chuck, our two little boys, our dog Brody and a flock of chickens. I'm all about real, good food and good times with awesome people. I spend a lot of time outside, in my garden, and concocting potions and helping people feel their best. I also like tea, reading, and about a million other hobbies. I'm so happy your here on this adventure with me.

Footer

Copyright © 2026 · Foodie Pro Theme On Genesis Framework · WordPress · Log in